Thursday, July 28, 2011

Catalan Salt Pinch Cake : Free and Easy Bake-Along #6

A simple cake with simple ingredients, but so tasty and so good! Catalan Salt Pinch Cake is our Bake-Along No. 6, together with Lena and Zoe. I made this cake twice. The first time I made this, the cake was flat with  an "eggy" smell to it. I knew then, that I did not beat the egg whites long enough. Dissatisfied, I made this again, and this time making sure that I beat the egg whites till really thick and glossy as instructed. 


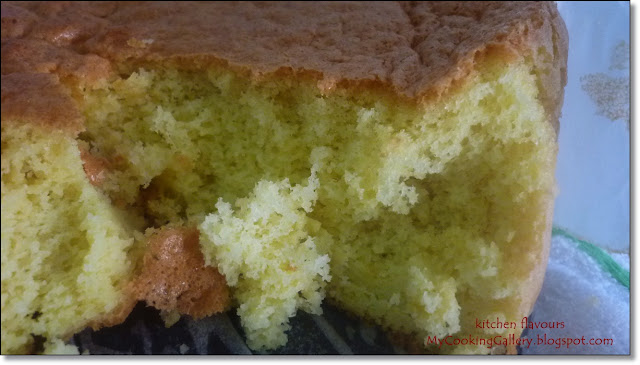
It came out really fluffy, soft and very tasty. This cake is similar to our local sponge cake. This time, it doesn't have the 'eggy' smell, as the lemon zest gives it a light lemony fragrance. 


Just as Rose says, this cake is best eaten by pinching! She's right! I did cut a slice to eat and somehow it is not the same as pinching some from the pan! Do not remove the parchment paper till the whole cake is consumed. Try it! It's a fun way of eating cake! The kids enjoyed eating it this way!


According to Rose, this cake was created in 1985 in Spain by Salt Bakery. This cake does not contain any oil or salt. The egg whites and the sugar must be whisked till really thick and glossy. Be prepared to whisk the egg yolks into the meringue 2 tablespoons at a time, whisking for 2 minutes after each addition. This took me about half an hour. But it is so worth it! My family loves it. I made this the evening before, ate a small piece to try and the next day, my son took some to school (he seldom asks for cakes to bring to school)! My daughter took some for breakfast and my hubby ate most of it, leaving me ....


....with this piece! I had this with a cup of Chinese tea. A lovely and light cake to snack on anytime of the day! Definitely worth making again. Let's go over to Lena of Frozen Wings and Zoe of  Bake For Happy Kids and see their Catalan Salt Pinch Cake.

For our next Bake-Along, we will be baking Coca-Cola Chocolate Cake from Cake Keeper Cakes by Lauren Chattman. Feel free to join in if you have this book, and just post it on 15/08, there's no linky to link to, as this is a Free and Easy Bake-Along! 

I'm sharing this with
Full Plate Thursday over at Miz Helen's Country Cottage
Bake With Bizzy over at Bizzy B. Bakes
Dessert Recipe Linky Party over at Joy Of Desserts
Sweets For A Saturday over at Sweet As Sugar Cookies

Catalan Salt Pinch Cake
(adapted from "Rose's Heavenly Cakes" by Rose Levy Beranbaum)
1 cup plus 2 tablespoons / 4 ounces / 112 gms sliced almonds, preferably unblanched
3/4 cup plus 2-1/2 tablespoons, divided / 6.3 ounces / 181 gms superfine sugar (I use 150gm)
6 large eggs / 1 cup plus 3 tablespoons (9.5 fluid ounces) / 10.6 ounces / 300 gms 
2 large egg whites / 1/4 cup (2 fluid ounces) / 2 ounces / 60 gms
1 teaspoon, loosely packed lemon zest, finely grated
1/2 cup plus 1 tablespoon (or 1/2 cup) / 2 ounces / 56 gms, cake flour (or bleached all-purpose flour)


SPECIAL EQUIPMENT :
One 9 by 2-1/2 to 3 inch springform or cake pan, coated with shortening, bottom and sides lined with parchment. For the sides cut a 33 by 3-inch band of parchment, overlapping an extra piece if necessary to make it long enough. Wrap and press it against the inside wall of the pan. Use some extra shortening to coat the overlapping ends to hold them in place against the first strip of parchment.
PREHEAT THE OVEN :
Twenty minutes or more before baking, set an oven rack in the lower third of the oven and preheat the oven to 325F/160C.
TOAST AND GRIND THE ALMONDS : (I skipped this step as I use almond meal)
Spread the almonds evenly on a baking sheet and bake for about 7 minutes, or until pale golden. Stir once or twice to ensure even toasting and avoid overbrowning. Cool completely. In a food processor, pulse the almonds and 2-1/2 tablespoons of the sugar until as fine as possible. Stop before the nuts start to become pasty.
PREPARE THE EGGS :
Pour the whole eggs into a 2-cup measure with a spout and whisk them lightly to break them up.
MIX THE MERINGUE :
In the bowl of a stand mixer fitted with the whisk beater, beat the egg whites on medium-low speed until foamy. Raise the speed to medium-high and beat until soft peaks form when the beater is raised. Gradually beat in the remaining sugar, stopping the mixer once to scrape down sides of the bowl. Continue beating until the meringue is very thick and glossy, but it will not be smooth. Detach the whisk from the mixer and use it to stir the almond mixture into the meringue until evenly incorporated.
MAKE THE BATTER :
Reattach the whisk beater and, with the mixer on medium speed, add the beaten egg to the meringue 2 tablespoons at a time, beating for 2 minutes between each addition. It should take a total of 20 to 25 minutes, but be sure to beat for a minimum of 20 minutes. Beat in the lemon zest. Remove the bowl and beater from the stand. While the mixture is beating, weigh or measure out the flour.
Sift the flour onto the batter and, using the whisk beater or a large balloon whisk, fold in the flour until fully incorporated. Reach to the bottom of the bowl and be sure that no white specks of flour remain. The best way to accomplish this is with your fingers, pinching any bits of flour to moisten them. Pour the batter into the prepared pan. (If using a 2-inch-high pan, the batter will come almost to the top of the pan).
BAKE THE CAKE :
Bake for 25 to 35 minutes, or until a wire cake tester inserted in the center comes out clean and the cake springs back when pressed very lightly in the center. The cake will rise just a little and then sink slightly in the center.
UNMOLD AND COOL THE CAKE :
Set the pan on a wire rack and immediately loosen and remove the sides, leaving the parchment attached to the cake. (If using a solid pan, lift the cake out using the parchment and set it on the wire rack). Allow the cake to cool until it is warm or room temperature, about 1 hour. Set the cake, still in the parchment, on a serving plate. (Leave the parchment in place until the entire cake is consumed).

Delicious eaten in the traditional way by pinching out pieces of the fluffy cake, the cake is also lovely for a tea: Serve pinched or sliced with fresh raspberries and lightly sweetened whipped cream. The cake keeps wrapped airtight for 1 week at room temperature, for 10 days refrigerated, and for 6 months frozen.

Tuesday, July 26, 2011

Fish and Chips, Challenge at Rebecka's

I have to admit, Fish & Chips is not one of my favourite food. Whenever we go out to eat at restaurants where there is Fish & Chips on the menu, both my kids would order. It is their favourite! Not for me though,  I really do love fried fish but I have never liked Fish & Chips! So when my hubby told me that he will not be joining us for dinner at home last Friday, I knew that this would be the perfect time to try my hands at making Fish & Chips for my kids. I have two pieces of frozen Dory fillets which I bought about two weeks ago for exactly this, as the lovely Rebecka from At Home With Rebecka is having this fun challenge "Is Your Batter Better" Fish & Chips Challenge. 


Fish & Chips, with Tartar Sauce and Corn Salad


I have never made Fish & Chips at home before, mainly because of the deep frying which would result in wastage of oil and also because I try not to deep fry too often, which I seldom do, anyway. So the quest for the "perfect" batter begins, I source for it from the internet, and there are so many that I couldn't decide which is the best. Most recipes calls for beer or soda water for the batter, I just use whatever I have in my pantry. The original recipe I copied from somewhere, and I cannot recall from where! But I tweaked it a little  and came up with this batter. Now how do this batter fare? Pretty good, I should say! It is really crispy and light. And tasty too! Be sure to test-fry a teaspoon of the batter first to ensure that it is sufficiently seasoned, before you coat the fish. I made two large pieces of fillet but the batter is enough for 4 pieces.  

My kids gave the thumbs up for this! They say it was really good!


They love the chips too! It is good but I did not fry it crispy enough, and did not season them with any salt, but they taste just as good!


I served the Fish & Chips with a corn salad on the side, and I love this best of all! Recipe to follow in another post, today is all about FISH & CHIPS!   :)


This is good! I think cod or snapper would be better, as the Dory fillet has a layer of fat that I have to discard before frying, but it is really economical to use Dory fillet, as cod is extremely expensive over here!


I'm submitting this to
"Is Your Batter Better?" Fish & Chips Challenge, At Home With Rebecka


Do you have a favourite batter for your Fish and Chips? Share it and join in the fun. Rebecka will try out all the recipes submitted and decide which is the best! This challenge is on for another 218 days! Pay a visit to At Home With Rebecka for the full details, and at the same time, enjoy her lovely blog! Rebecka has wonderful recipes and she's good at creating new ones! Come on, make some Fish and Chips for your family and submit your recipe to "Is Your Batter Better" Fish & Chips Challenge.  See you there!

Rebecka, I hope you enjoy trying out this recipe! This may not be the best, but it is fun, as this is the first time that I've actually attempted Fish & Chips at home and it was great seeing that my kids really enjoyed it! Thank you for the Challenge!

Fish and Chips
3 medium potatoes (I use russet potatoes)
For the Fish
4 pieces fish fillet (I use Dory fillet)
Oil for deep-frying
salt to season
Seasoned Flour for coating/dredging
1 cup self-raising flour
1/4 teaspoon salt, or to taste
1/4 teaspoon paprika powder
dash of black pepper powder
Batter for frying
1 egg
1 cup water
1 cup self-raising flour
1/2 teaspoon salt, or to taste
1/4 teaspoon paprika powder
dash of black pepper powder

  1. For the chips : Peel potatoes and slice into long sticks about 1/4 inch thick. Place them in a bowl, pour enough ice cold water to soak. Place the bowl in the fridge and leave for an hour or so. 
  2. Seasoned Flour for coating : Mix flour, salt, paprika powder and black pepper powder in a large wide plate. Keep aside.
  3. For the batter : In a large bowl, whisk egg gently and add in water, whisking till evenly mixed. Add in flour 1/4 cup at a time, whisking till evenly mixed and there are no lumps. Make sure the batter is smooth. Add salt, paprika powder and black pepper powder, whisk till evenly combined. Keep covered at room temperature for 20 minutes.
  4. To fry the chips : Drain potatoes and wipe dry with kitchen towel. Heat oil on medium heat, and fry potato slices, depending how big your pan is, you may need to separate into two or three batches to fry. Fry for about 4-5 minutes until light brown. Remove and drain on paper towel. Repeat with the rest of the potaotes.  To fry till crisp, increase heat slightly. When oil is hot, place potatoes into hot oil and fry for another minute or two, stirring gently until potatoes are golden brown and crisp. Remove and drain in paper towel. Place potato in baking tray lined with parchment paper and  keep in oven with low temperature (about 110C)  to keep warm.
  5. To fry the fish :  Heat oil for deep frying. Rinse fish and pat dry with kitchen towel. Coat fish in Seasoned Flour on both sides till well coated, shaking off excess flour. Dip fish in batter (stir before coating) on both sides till evenly coated. Carefully release fish in hot oil on medium heat and fry till light brown. Turn over and fry till both sides are golden brown. This may take about 5 minutes on each side. Remove fish and drain on kitchen towel. Serve with chips seasoned with a little salt, your favourite dipping sauce and salad of your choice. Enjoy!


Saturday, July 23, 2011

Chicken Braised with Onions and Shallots

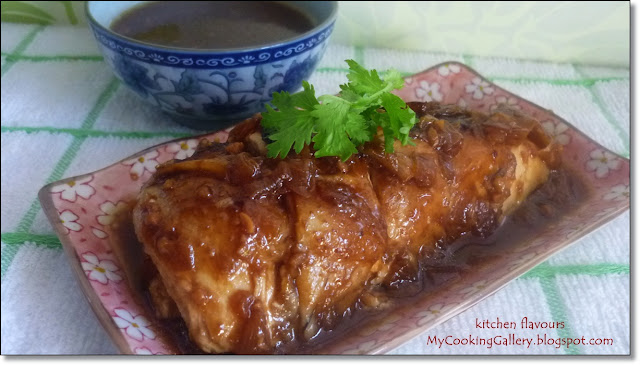
Cooked this the second time in less than two weeks. Back by popular demand! Request from my kids. I cooked this last week, with only half a chicken, after braising, well, you know, the chicken sort of shrunk in size! I cooked a whole chicken this time. 


This chicken is braised in the onions and shallots sauce. The balance of saltiness, sweetness and the flavours from the onions and shallots are delicious. This recipe calls for 1-1/2 tablespoon of sugar, but I only use less than 1 tablespoon. I would advise to add in a little sugar and try whether the sweetness is enough. Too much of sugar will dominate the sweetness of the onions. And I add on another extra onion, I love onions and I feel that onions always makes a dish tastes better.


Braise over low heat, during braising, when it appears dry, some chicken stock or water may be added in. My family love sauces, so when it gets a little too thick at the end, I add in a little more chicken stock to the consistency I want. Let it boil a couple of minutes more.


This is really good with some plain white rice.


My son's favourite chicken dish, at the moment! This is a great dish to go with plain white rice, especially for kids, they will enjoy the tender chicken and the delicious gravy over the rice. Yummy!

I'm sharing this post with

Chicken Braised with Onions and Shallots
(adapted from "My Chinese Kitchen" from Eileen Yin-Fei Lo)
One 4-1/4-pound chicken, fat and membranes removed, rubbed well with 4 tablespoons salt, rinsed, and place in a sitting position in a strainer to drain (I skipped this step, I just wipe chicken dry with paper towels)
3 tablespoons double dark soy sauce, regular dark soy sauce, or mushroom soy sauce
2 tablespoons peanut oil
1 tablespoons minced fresh ginger
1 tablespoons minced garlic
2 ounces shallots, peeled and cut into 1/4-inch dice
1 small onion, peeled and cut into 1/4-inch dice (I use 2 onions)
1-1/2 tablespoons bean sauce
3 tablespoons oyster sauce
1/4 cup Shao-Hsing wine or dry sherry
1-1/2 cups chicken stock
2 teaspoons soy sauce
2-1/2 tablespoons sugar
8 sprigs fresh coriander (cilantro)
  1. Place the drained chicken on a large platter and rub with 1-1/2 tablespoons of the dark soy sauce, making certain the chicken is well coated. Tie the chicken legs together with string. (I skipped this step).
  2. Heat a wok over high heat for 40 seconds. Add the peanut oil and coat the wok with it using a spatula. When a wisp of white smoke appears, add the ginger and garlic and stir. When the garlic turns light brown, add the shallots and onion, stir to mix, and cook for 1-1/2 minutes. Add the bean sauce, stir and mix, and cook for 1 minute. Add the oyster sauce and stir well. Add the wine and stir in. When the mixture begins to boil, and the stock and return to a boil.  Add the remaining dark soy sauce, the regular soy, and the sugar, mix well and return to a boil. Place the chicken in the wok, breast side down, and with a spatula coat the chicken well. Cook for 2 minutes. Turn the chicken over and repeat until all 4 sides are sealed. Care should be taken that the heat is not too high, or the chicken skin can burn.
  3. Turn off the heat. Transfer the chicken and sauce to a Dutch oven, breast side up. Cover and bring to a boil over medium heat. Lower the heat and simmer for 30 minutes, covered. Use a wooden spoon to move the chicken about several times to prevent sticking. Turn the chicken over and simmer for another 45 minutes, moving the chicken with a wooden spoon. Turn off the heat and allow the chicken to rest in the pot for 20 minutes. The sauce should reduce to 1-1/4 cups.
  4. Remove the chicken to a cutting board, tail up, breast out. With a cleaver, cut from the tail down the backbone, until the chicken is cut in half. Remove the skin and bones. Cut into bite-sized pieces, place on a serving platter, pour the sauce over the chicken, sprinkle with coriander, and served with cooked rice.

Wednesday, July 20, 2011

Strawberry Frozen Yoghurt

These gorgeous strawberries, which are grown locally in Cameron Highlands, Malaysia are on offer from TESCO. I bought three packs home and churned out this delightful frozen yoghurt. Though our local strawberries are not as sweet as the imported ones,  they are still wonderful. I use my homemade yoghurt for this. Frozen yoghurt is definitely a healthy option to ice cream that has egg yolks and cream, and is just as delicious!


Our local strawberries from Cameron Highlands


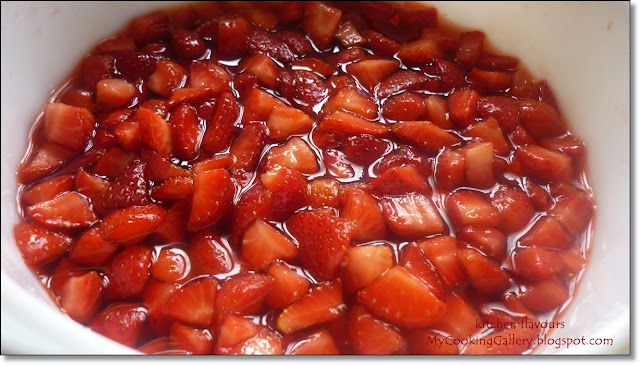
The sliced strawberries macerated in the sugar and vodka with its own juices. Delicious!


Strawberry Frozen Yoghurt. 
Look at the beautiful gorgeous colour!


As what David says, "the biggest blast of strawberry flavour imaginable"! 
This is so refreshingly delicious!

For other recipe that uses all those gorgeous berries, now that summer is here at some parts of the globe, take a look at a lovely blog from Greece, Kitchen Stories. Kitchen Stories blog is in two languages, Greek and English, just click here for the English language.  Kitchen Stories has made a Fruit Pie that looks so delicious and  perfect for all the abundant summer berries that are just waiting to be used up. I wish we have summer berries here! I'm so jealous!  :) Hop over to Kitchen Stories for this delicious Fruit Pie and other yummy desserts, just say that you are dropping in from Kitchen Flavours!  :)


I'm sharing this with
Full Plate Thursday over at Miz Helen's Country Cottage
Sweet Tooth Friday over at Alli n Son
Vintage Recipe Thursday over at Joy of Desserts
Fresh Food Friday over at la bella vita


Strawberry Frozen Yogurt
(adapted from "The Perfect Scoop" by David Lebovitz)
Notes from David " This frozen yogurt is a snap to put together, especially welcome in the summer which is when you may want to limit your time in a  warm kitchen. But don't let its ease of preparation fool you; this vibrantly coloured frozen yogurt provides the biggest blast of strawberry flavour imaginable."


1 pound (450gm) fresh strawberries, rinsed and hulled
2/3 cup sugar (130gm) sugar
2 teaspoons vodka or kirsh (optional) 
1 cup (240gm) plain whole-milk yoghurt
1 teaspoon freshly squeezed lemon juice


Slice the strawberries into small pieces. Toss in a bowl with the sugar and vodka or kirsh. If using, stirring until the sugar begins to dissolve. Cover and let stand at room temperature for 1 hour, stirring every so often.
Puree the strawberries and their liquid with the yogurt and lemon juice in a blender or food processor until smooth. If you wish, press the mixture through a mesh strainer to remove any seeds.
Refrigerate for 1 hour, then freeze in your ice cream maker according to the manufacturer's instructions.

Monday, July 18, 2011

Super-Delicious Whole-Wheat Carrot Cake : Free and Easy Bake-Along #5

My baking buddies, Lena, Zoe and myself (The Three Baketeers!) have decided to bake "Super-Delicious Whole-Wheat Carrot Cake" for our Bake-Along. Carrot cake is not one of my favourite cake but I was interested in this recipe as it uses a mixture of wholewheat flour. This is a really easy cake to bake, it takes only minutes of preparation. The only thing is to grate the carrots, which I am not fond of, I never did like to grate anything, especially chocolates! Messy! Messy! Lazy me! :) 


This cake baked up beautifully.


It cuts really well.


It is really moist, and you would never know that there's wholewheat flour in it if you take a bite, maybe because the amount of wholewheat flour is just 1/3 cup. This is a nice cake, but it is a little too sweet for me. I usually reduce the sugar for most cake recipes, but I did not for this cake! Instead of 1 cup firmly packed brown sugar, I very "loosely-packed" instead, and it is still sweet!


Let's hop over to my baking buddies Lena of Frozen Wings and Zoe of Bake For Happy Kids and see their version of this cake. For our next bake-along we will be baking Catalan Salt Pinch Cake from Rose's Heavenly Bakes  and will be posting it on 28th July. If you  have this book and would like to join in, please do, just post about it on 28th July, that's it! There's no linky to link to, after all, this is a "Free and Easy Bake-Along"!

I'm sharing this with
Bake with Bizzy at Bizzy B. Bakes


Super-Delicious Whole-Wheat Carrot Cake
(adapted from "Cake Keeper Cakes" by Lauren Chattman)
Serves 9
1/2 cup (1 stick) unsalted butter, melted and cooled
1 cup firmly packed light brown sugar
2 large eggs
1/4 cup milk
1 cup unbleached all-purpose flour
1/3 cup whole-wheat flour
1 teaspoon baking powder
1 teaspoon ground cinnamon (I only use a pinch)
1/4 teaspoon salt
1/2 cup chopped walnuts
1/2 cup dark raisins
2 cups peeled and grated carrots (about 4 medium carrots)
1/2 tsp vanilla extract (my addition)

  1. Preheat the oven to 350F. Coat the inside of an 8-inch square baking pan with cooking spray and dust with flour, knocking out any excess.
  2. Whisk together the butter and brown sugar in a large mixing bowl. Whisk in the eggs and then the milk. Stir in the all-purpose flour, whole-wheat flour, baking powder, ground cinnamon, and salt until combined. Stir in the walnuts, raisins, and carrots.
  3. Scrape the batter into the prepared pan and smooth the top with a rubber spatula. Bake the cake until it is golden and a toothpick inserted in the center comes out clean, 35 to 40 minutes. Let the cake cool in the pan for about 15 minutes, invert it onto a wire rack, and then turn it right side up on a rack to cool completely. Cut into 9 squares and serve.
  4. Store uneaten squares in a cake keeper or wrap in plastic and store at room temperature for up to 3 days.

*******

Friday, July 15, 2011

Brown Sugar Bundt Cake

I love ready-to-eat prunes in baking than actually eat them as they are. When used in baking and desserts, they tastes wonderful and the flavours really stands out. Prunes are rich with vitamins, high in fiber and virtually no fats! This cake recipe uses prunes and pears. I used apples instead of pears and some Sunsweet Ready-to-eat prunes which has been sitting on my kitchen table for the last two months or so! 

This cake is moist, soft and really good! Another wonderful recipe from Dorie Greenspan which is definitely a keeper. As usual, I reduced the brown sugar, and it is just right for me, it is not overly sweet, just the right amount of sweetness, together with the slightly sourish tangy prunes, this cake is wonderful. Good either with a cup of coffee or tea, though I would go for tea with this.


Whisk the flour, ground hazelnuts, baking powder, baking soda, salt  in a medium bowl. Cream the sugar and butter and add in the eggs. Add in the flour alternately with the buttermilk, ending with flour. 


I replaced the buttermilk with 2/3 cup of homemade yoghurt and 1/3 cup of milk, mix them together. Buttermilk is quite costly over here, and not easily available too, and once the carton is opened, it does not keep for long. This substitution of buttermilk with yoghurt and milk is one of the handy tips by Dorie, which is really great, as I always have homemade yoghurt in my fridge. I only buy commercial yoghurt as a starter, ever since I started making my own, which is gloriously creamy and delicious. If you have not tried making yoghurt before, try it, it is really very easy, no equipment is necessary. I did not use any special equipment at all. All you need is a deep pot, 1 litre of milk and 2 tablespoon of live cultured yoghurt starter! For homemade yoghurt recipe, click here


Add in the chopped apples and prunes, stir to combine. Pour into my lovely WILTON bundt pan :) and bake for about 60-65 minutes, check to see whether top is browning too fast, and cover with a piece of aluminium foil if needed. I checked the cake at 45 minutes of baking time, and found that it is browning too fast, so a piece of aluminium foil is placed on top.


 A lovely cake is ready!


 The prunes and apples are scattered all over the cake, yummy! I gave half of this cake to my nice neighbour!


The texture is really soft, moist, and yummy!

I'm sharing this with
Full Plate Thursday at  Miz Helen's Country Cottage
Recipe Swap Thursday at Prairie Story
Bake With Bizzy at Bizzy B. Bakes
Sweets For A Saturday at Sweet As Sugar Cookies


Brown Sugar Bundt Cake
(adapted from "Baking From My Home To Yours" by Dorie Greenspan)
2-1/4 cups all-purpose flour
1/2 cup ground hazelnuts or walnuts (or 1/4 cup more all-purpose flour)
1 teaspoon baking powder
1/2 teaspoon baking soda
1/4 teaspoon salt
2 sticks (8 ounces) unsalted butter, at room temperature
2 cups (packed) light brown sugar (I use 1-1/2 cups, lightly packed)
3 large eggs, at room temperature
1-1/2 teaspoons pure vanilla extract
1/4 teaspoon pure almond extract (only if you're using ground nuts)
1 cup buttermilk, at room temperature
2 medium pears, peeled, cored and cut into 1/4-inch dices (I use apples)
1/2 cup moist, plump prunes, snipped into 1/4 inch pieces, or 1/2 cup moist, plump raisins (dark or golden)
Confectioner's sugar, for dusting


GETTING READY : Center a rack in the oven and preheat the oven to 350 degrees F. Butter a 9 to 10 inch (12-cup) Bundt pan, dust the inside with flour and tap out the excess. If your pan is not nonstick, dust the interior of the pan with flour, then tap out the excess. (If you've got a silicone Bundt pan, there's no need to butter or flour it). Don't place the pan on a baking sheet - you want the oven's heat to circulate through the Bundt's inner tube.


Whisk together the flour, nuts, baking powder, baking soda and salt.


Working with a stand mixer, preferably fitted with a paddle attachment, or with a hand mixer in a large bowl, beat the butter and sugar together at medium speed until light and fluffy, about 3 minutes. Add the eggs one at a time, beating for 1 minute after each addition. Beat in the vanilla and the almond extract, if you're using it. Reduce the mixer speed to low and add the flour mixture and the buttermilk alternately - add the flour in 3 additions and the buttermilk in 2 (begin and end with the dry ingredients). Mix only until the ingredients are incorporated and scrape down the bowl as needed. With a rubber spatula, stir in the pears and prunes. Scrape the batter into the pan and smooth the top with the spatula.


Bake for 60 to 65 minutes, or until a thin knife inserted deep into the centre of the cake comes out clean. (If the cake looks as if it's browning too fast, cover the top loosely with a foil tent). Transfer the cake to a rack and cool for 10 minutes before unmolding, then cool to room temperature on the rack.


When your're ready to serve, dust the top of the cake with confectioner's sugar.


STORING : Not surprisingly, this cake is a good keeper. It will keep for 5 days wrapped well and at room temperature - it's really better the next day after it is baked than it is on the bake day - and it can be frozen for up to 2 months; defrost still wrapped.


Wednesday, July 13, 2011

Lemon Curd and Ice Cream

I love lemon curd! This is the second recipe that I've tried, first one being David Lebovitz's, here. I thought of trying out other recipes, and this particular recipe I got from Rachel Allen's "Rachel Favourite Food At Home",  Rachel's method of cooking this curd is simpler. The curd is really tangy with full flavour of the lemons! For those who likes a  sweeter curd, extra sugar can be added. I like both David's and Rachel's curd recipes, but when it comes to ease of making, I think Rachel's simpler!


The beautiful colour of the lemon and the egg yolks gives a gorgeous looking curd.

Rachel has even provide a recipe for making Lemon Curd Ice Cream, which of course I can't help, but make that too!

Lemon Curd
(adapted from "Rachel's Favourite Food At Home" by Rachel Allen)
2 eggs
1 egg yolk
100gm (4oz) butter
175gm (6oz) caster sugar
finely grated zest and juice of 3 lemons


Beat the whole eggs and extra egg yolk together. Melt the butter in a saucepan over a very low heat. Add the caster sugar, grated zest and lemon juice and then the beaten eggs. Stir carefully over a very gentle heat until the mixture thickens. This may take about 10 minutes. If the heat is too high, the eggs will scramble.
When the mixture is thick enough to coat the back of a spoon and leave a clear mark when you push your finger through it, the curd is cooked ready.
Remove from the heat and pour into a sterilized jar. Allow to cool, then place in the fridge for up to 2 weeks.


(kitchen flavour's notes : Taste and add a little sugar during stirring, if a sweeter curd is desired. It took me about 20 minutes for the curd to thickened)


Let's have some tangy ice cream!

Ingredients for this tangy ice cream, lemon curd, yoghurt ( I use homemade yoghurt) and creme fraiche (I use whipping cream). According to Rachel Allen, you don't need an ice cream machine to make this. But I did, and since I use whipping cream, might as well whip it for a creamy and fluffier ice cream. 


This is a really tangy ice cream, full of lemon flavour. If you like your ice cream sweeter, you have to add more sugar, as this is quite sour. I like it like this, tangy and sour! Enjoy!


Lemon and Ginger Ice Cream
(adapted from "Rachel's Favourite Food At Home" by Rachel Allen)
Notes from Rachel : This is such a delicious, light, one-step ice cream -  and you don't need an ice-cream machine to make it. Leave out the ginger if you prefer
400ml (14 fl oz) cool Lemon Curd
600ml (20 fl oz) natural yoghurt
600ml (20 fl oz) creme fraiche
4 tbsp finely grated ginger


Fold together the lemon curd, yoghurt, creme fraiche and ginger and place in the freezer for a few hours until frozen.

(kitchen flavour's notes : I did not add the ginger and only made half the recipe.  I use the ice cream maker and churn until creamy and thick. Transfer to a container and freeze.)

Monday, July 11, 2011

Spicy Tofu and Edamame Beans

This is a lovely and tasty tofu dish. It is the first time that I'm cooking with Edamame Beans (soy beans), which I usually have  at restaurants, but never at home. I use the frozen ones for this dish, and I love it! It's healthy  and delicious. This recipe for Spicy Tofu and Edamame Beans is from Ching-He Huang, ever heard of her? She's a young and talented chef specializing in Chinese cooking. Her recipes are simple, quick and looks delicious. Most of the ingredients used are the basics which you can find in any Chinese kitchen, and that works for me.  

Ever wonder how tofu are made? Well, there's an interesting video here, where it shows exactly that and features Ching-He Huang cooking up this lovely tofu dish.


Rinse and pat dry firm tofu, cut to  1/2 inch thick rectangles.


Frozen Edamame Beans 


 The lovely sweet beans


Tofu are fried and braised for a short while to absorb the flavours 


A delicious plate of tofu is ready ! I love everything about this dish. The tofu has absorbed all the flavours from the soy sauce and balsamic vinegar,  the sweet Edamame beans together with  the aroma and lovely taste of the corianders are just great. Get a good generous bunch of young tender corianders.  This dish is not spicy at all, of course it depends from the heat of the red chillies, for a spicier dish, use chilies with more heat, if you like.


Really good with steamed rice. Perfect for vegetarians.  Enjoy! 

I'm sharing this with Hearth and Soul Hop over at Mom's Sunday Cafe.


Spicy Tofu and Edamame Beans
(recipe courtesy : Ching-He Huang, source from Cooking Channel)
Ingredients
Bean Curd Stir-Fry
2 tablespoons groundnut oil (peanut oil)
14 ounces firm fresh bean curd (firm tofu), drained and cut into 1/2 inch thick rectangles
3 tablespoons light soy sauce
1 teaspoon dark soy sauce
1 tablespoons black rice vinegar (recommended : Chinkiang) or balsamic vinegar
1 teaspoon dried chili flakes


Edamame Beans
1 tablespoon groundnut oil (peanut oil)
1 red chili, seeded and finely chopped
water, as needed
3 ounces fresh or frozen edamame beans, thawed
1 teaspoon light soy sauce
1 teaspoon black rice vinegar (recommended : Chinkiang) or balsamic vinegar
Handful fresh cilantro leaves and stalks, finely chopped
Serving suggestions : serve with steamed rice


Directions :
To make the bean curd : Heat the groundnut oil in a large flat-bottomed pan over a medium heat. Add the bean curd, and cook for 2 minutes. Add the light soy sauce and cook until the sauce has reduced and the bean curd is browned on one side. Using a small palette knife or fork, lift and turn each piece, careful not to break the bean curd. Cook just to colour the second side.
Add the dark soy sauce, and vinegar, and cook until the liquid has reduced by half. Season the dish with the dried chili flakes. Transfer the bean curd to a serving plate and set aside.

To make the edamame : Reheat the pan and add the groundnut oil. Stir-fry the chili for a few seconds, and then add the edamame beans. Add a sprinkle of water to help create steam, and cook for less than 1 minute. Season the edamame with the light soy sauce, and vinegar, then stir in the chopped cilantro.

To serve, pour the edamame beans over the bean curd and serve immediately. For a fuller meal, serve with steamed rice.

Notes from Ching-He Huang :
This is a tasty nutritious dish. Here soya beans that have been made into bean curd are introduced to fresh soya beans (edamame) and the contrast is fabulous, a vegetarian marriage made in culinary heaven. Simple to prepare in a matter of minutes.


******

Saturday, July 9, 2011

Chocolate And Hazelnut Toffee Tart

A couple of days ago, we had my birthday dinner at a Vietnamese restaurant, a treat from my hubby. Yup, no cooking on that day :)  We were late, as my kids had some schoolwork to finish and by the time we reached the restaurant, we were really hungry! It was a lovely dinner. I enjoyed the appetizers more than the main course! Took some pictures to share.


Vietnamese Spring Rolls, this is REALLY good! Served with some delicious sweet salty sauce, yummy! There's another appetizer dish which we ordered, a huge piece of prawn crackers topped with fresh shredded veggies with a drizzle of light sweet and sour sauce , with cold prawns and squids, really delicious. I have forgotten to take the photo for this appetizer.


A side dish, small little saucers filled with steamed rice flour topped with some fried shallots, garlic (and some other secret ingredients!) and croutons, with some sauce to spoon over and enjoy! Really good!


I ordered this for myself, Vietnamese Rice Vermicelli with a  pot of sour spicy soup over a  hot mini stove, with fresh prawns, celery, tomatoes and bean sprouts. Nothing special about this main dish, quite ordinary, I still prefer the appetizers!


My hubby ordered Fish braised in sweet and salty sauce, with a pot of hot sour soup over a mini stove,  some prawns, veggies and a bowl of rice. The fish is nice.


My daughter ordered a plate of noodles with chicken, prawns, squids and some veggies.  My son ordered a bowl of chicken ball noodles, which is very tasty, and again, I have forgotten to take a photo of his noodles, we were extremely hungry!  :)


 A glass of delicious refreshing drink! Basil, Lime and Soda, this is so good!


A pot of Vietnamese tea for my hubby.


The cute little saucer has a depression in the centre to place the little teacup. 

We really enjoyed the dinner and I would not mind going back there again just for the appetizers! By the time we reached home it was already 10.30pm and all of us were so stuffed from dinner that we did not even have our dessert. I made for myself Chocolate and Walnuts Toffee Tart, on that same evening, before we left for dinner. By the time we came back, the chocolate has not quite set yet. And since we were so full from dinner,  I placed the tart in the fridge, after the birthday song :)  and only have it the next day.


Happy Birthday to me!  :)

Oh my! this is SO DELICIOUS! I am overall not a number one fan of chocolates, but this is incredibly good! If you love chocolates, please do make this! It's not difficult to do, I would say it is quite simple and easy, and the end result is just fantastic! The original recipe uses hazelnut, but since I have only walnuts, I use that instead. Rachel says to serve it at room temperature, but we prefer it chilled, take it out from the fridge and leave it for about 5-7 minutes before serving. Heavenly!


The sweet crust is not sweet at all, it has all the right balance of butter and sugar, I really like the crust, it would be a nice basic crust for any sweet tarts.


The walnut toffee filling is so good, with just the right amount of sweetness.


The chocolate mousse is smooth, creamy and delicious. I use a bar of semi-sweet chocolate instead of dark chocolate as that was what I had, and it is lovely.


Put them all together, the lovely crust, the walnut filling and the smooth creamy chocolate, and you will get a delicious, gorgeous chocolate tart! Go make this!
Chocolate and Hazelnut Toffee Tart
(adapted from "Rachel's Favourite Food At Home" by Rachel Allen)
1 portion of Sweet Shortcrust Pastry (recipe below)
For The Hazelnut Toffee :
50gm (2 oz butter)
75ml (2-3/4fl oz) single cream (I use heavy cream)
100gm (4oz) soft light brown sugar (I use 80gm)
150gm (5oz) hazelnuts, roased, peeled and coarsely chopped (I use walnuts)


For The Chocolate Mousse :
200ml (7fl oz) single cream (I use heavy cream)
200gm (7oz) dark chocolate, broken into pieces


To serve :
Cocoa powder (optional)
Softly whipped cream


Roll out the pastry to line a 25cm (10 in) tart in. Cover and chill for 20 minutes, then blind bake. The pastry will not go into the oven again, so it must be completely cooked.

For the hazelnut toffee layer, place the butter, cream and brown sugar in a saucepan, bring to the boil and simmer for 2-3 minutes until slightly thickened. Remove from the heat, add the hazelnuts and allow it to cool. Spread over the cooked tart shell.

For the chocolate mousse, place the cream in a saucepan and bring to the boil, remove from the heat and immediately add the chocolate, stirring until the chocolate has melted and mixed with the cream. It should be just tepid now. Pour over the hazelnut toffee in the pastry case.

Place the tart somewhere cool until the chocolate mousse has set. If you are keeping it in the fridge, let it come to room temperature before you serve. Dust the tart with cocoa (if using), slice and serve with softly whipped cream.


Sweet Shortcrust Pastry
(adapted from "Rachel's Favourite Food At Home" by Rachel Allen)
This makes enough to line one 28cm (11in) square or one 25cm (10 in) square tin (with a little left over), or two 20cm (8in) square tins, (it is best if they have removable bases). Uncooked pastry freezes perfectly, so it is handy to have some in the freezer. It will also keep in the fridge for a couple of days.

250gm (9 oz) plain flour
125gm (4-1/2oz) butter, diced and softened
1/2 - 1 egg, beaten
25gm (10 oz) icing sugar

Place the flour and butter in a food processor. Whiz for a few seconds, then add half the beaten egg and continue whizzing. You might need to add a little more egg, but don't add too much - the pastry should just come together. (If making by hand, rub the butter into the flour, then use your hands to bring it together with the egg). Flatten out the ball of dough to a thickness of about 3cm (1-1/4 in), wrap or cover with cling film, and place in the fridge for at least 30 minutes.

When you are ready to roll the pastry, remove from the fridge. Place the pastry between two sheets of cling film, which should be bigger than your tart tin. Using a rolling pin, roll it out until it is no thicker than 3mm (1/8 in). Make sure to keep it round, if the tin is round, and large enough to line the base and sides of the tin.

Removing the top layer of cling film, place the pastry upside-down (cling film side facing up) in the tart tin. Press into the edges, cling film still attached and, using your thumb 'cut' the pastry on the edge of the tin to give a neat finish. Remove the cling film and pop the pastry in the freezer for at least 10 minutes.

BLIND BAKING :
Blind baking is a way of partially cooking a pastry case before adding its filling. Preheat the oven to 180C (350F), Gas mark 4. Line the pastry with greaseproof paper when cold (leaving plenty to come up the sides), fill with baking beans or dried pulses (you can use these over and over), and bake for 15-20 minutes, until the pastry feels dry. Remove the paper and beans, brush with a little leftover beaten egg and return to the oven for 2 minutes. Take out of the oven and put to one side while you prepare the filling. This can be easily made a day in advance.

(kitchen flavour's notes : I made 3/4 of this pastry recipe and use a round 9" tart pan. I baked blind for 20 minutes, remove the paper and beans, and bake for another 7-8 minutes till the pastry is cooked and golden brown.)