Friday, June 29, 2012

THB : Almond-Crusted Butter Cake

Our 5th bake over at The Home Bakers (THB), where we are currently baking from "Coffee Cakes" by Lou Seibert Pappas. Emily from Emily's Cooking (Makan2) Foray has chosen Almond-Crusted Butter Cake as our fifth bake. If you have not heard of Emily, drop by her site, she's a super baker, who always bakes 3 types of bakes all in one night when she comes home from work! Now, isn't that super? 


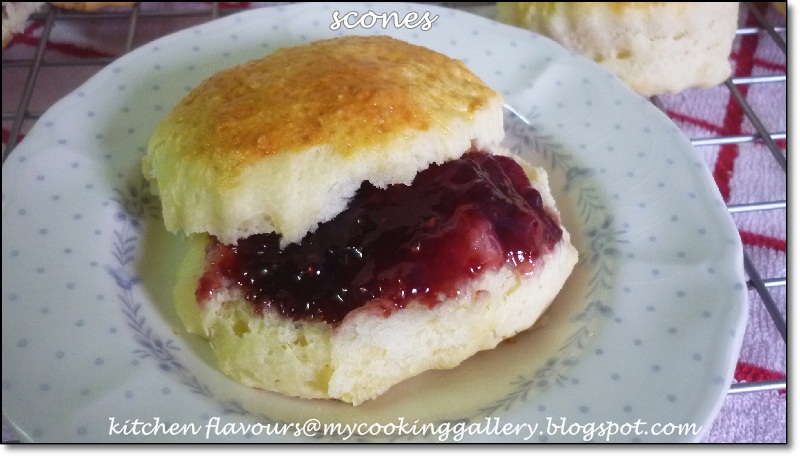
Almond cakes is one of my favourite, so I was really looking forward to this. This cake has a crust with flake almonds all around. It would definitely look nicer if baked in a bundt pan as shown in the book, or it can be baked in two loaf pans. Since I only made half a recipe, I baked this in a loaf pan. Flake almonds are scattered all over the greased pan, I did not scatter them over the bottom, now why didn't I do that, I have no idea! I placed the almonds a little too high in the pan, I realised that before I pour in the batter, but then I thought that the almonds would probably move its' position during baking, obviously I guessed wrong! The almonds stays where they are! 


Look at the almonds all around the cake, almost like protecting the cake, a fortress in itself! Hahaha! The cake rises rather well even though there's no leavening used at all. The eggs must have done a very good job in helping it rise. I find it interesting that powdered sugar is used for this cake. I use about 180gm powdered sugar and still find it a little sweet. 


The fragrance from the almond extract and the almond flakes are really nice. This cake has a rather compact texture with smooth crumbs. Though it is not as moist as most butter cakes, it is not dry at all,  I like it. The only thing that I must really add on are the almond slices! Mine has got very little almonds, I realised that when I cut a slice to eat and wished there were more almonds at the sides!


Overall, this is a nice cake. Great with a cup of coffee and even tea.

Please visit Emily for the recipe and to view the other members bake on this cake, do drop by THB.


Welcome to The Home Bakers


THB is currently baking from Coffee Cakes by Lou Seibert Pappas, if you would like to join in, please hop over to THB for details on how to become a member. Everyone's welcome!


Tuesday, June 26, 2012

Scones : Free And Easy Bake-Along #27, Theme : Scones

It's Bake-Along time! Scones is the theme that Lena from Frozen Wings chose for our Bake-Along No. 27. I love eating scones, especially when they are warm minutes after baking. I thought of making some sweet scones as well as savoury, I've already chosen the recipes, but then that did not happen! The weather is really hot, and much as I love to bake, somehow the weather puts me off from baking more often than I would have liked. Many a times when  butter was taken out earlier, my recipe book, opened on a chosen recipe, I would stand right in my kitchen, sweating and irritated, and decided to call it quits! Hot and humid! Excuses, but really, all I could think of was a shower, switch on the air-cond and relax with a cup of tea and some homemade bakes, but of course, there is no homemade bakes, when the baker call it quits! :)

So my plans for sweet scones and savoury ones remain as my plans, for the time being! I made these more than a week ago, would you call this savoury, this is definitely not sweet, as there's no sugar in them. Savoury? I will just describe them as original!


These lovely scones is from one of Nigella Lawson's earlier cookbooks "How To Be A Domestic Goddess"


These scones uses lots of baking soda and cream of tartar. I almost did not make these, just because of the amount used for these two ingredients. But then Nigella Lawson describes these as the best scones she's ever eaten, so I was rather curious! According to her, the cream of tartar contributes to the lightness of the scones. And Nigella advises to eat this freshly baked, while still warm from the oven.


These scones are lovely. They are indeed buttery, light and tender, and I like eating these plain while still warm. 


Spread it with your favourite jam or clotted cream as suggested by Nigella, or just ate them plain like I did with a cup of tea. I reheated some leftovers by wrapping them in aluminium foil for about 8-10 minutes in the oven and they will be soft again. Do not throw away the aluminium foil, simply wipe them clean and reuse again for heating other bakes like breads and cakes. Reuse and recycle!


To take a look at all the lovely scones, please visit my baking buddies, Lena from Frozen Wings and Zoe from Bake For Happy Kids, and our baking friends who has baked along with us in the linky below.


Photobucket


For our next Bake-Along, we shall be baking Coconut Checkerboard Brownies from Bon Appetit Desserts, page 589 or you may get the recipe here. The link for this bake will be open from 11 July to 17 July. Please do join us, everyone's welcome!


Lily's Scones
(adapted from "How To Be A Domestic Goddess" by Nigella Lawson)
3-1/2 cups all-purpose flour
1 teaspoon salt
2 teaspoons baking soda
4-1/2 teaspoons cream of tartar
1/4 cup cold unsalted butter, diced
2 tablespoons vegetable shortening, in teaspooned lumps
1-1/3 cups milk
1 large egg, beaten, for egg-wash

2-1/2-inch crinkle-edged round cutter
1 baking pan, lightly greased

Preheat the oven to 425F.
Sift the flour, salt, baking soda, and cream of tartar into a large bowl. Rub in the fats till the mixture goes like damp sand. Add the milk all at once, mix briefly - briefly being the operative word - and then turn out onto a floured surface and knead lightly to form a dough.
Roll out to about 1 to 1-1/4 inch thickness. Dip the cutter into some flour, then stamp put at least 10 scones. You get 12 in all from this, but may need to reroll for the last 2. Place on the baking sheet very close together -the idea is that they bulge and stick together on cooking - then brush the tops with the egg wash. Put in the oven and cook for 10 minutes or until risen and golden.
Always eat freshly baked, preferably still warm from the oven, with clotted cream and jam or, my favourite, Thunder and Lighting, which is clotted cream and molasses.

Variation :
Add 3 ounces of raisins or golden raisins for fruit scones, or, something I'm keen on, use the same amount of dried sour cherries, with or without the finely grated zest of 1/2 an orange. To make cheese scones, add 3 ounces of sharp Cheddar, grated.


Join our blog hop, get the codes from the link below
get the InLinkz code

Sunday, June 24, 2012

Watermelon With Fresh Mint And Lime : The Picnic Game

I am "going" on a picnic and I'm bringing a refreshing dessert beginning with the letter W, ....  for Watermelon With Fresh Mint and Lime. Louise, the lovely lady behind Months of Edible Celebration  is hosting an on-line picnic called "The Picnic Game"! And I'm "going" on a picnic with Louise and all the lovely ladies who has joined in the fun.  Naturally I'm pretty excited as this is the first time that I've joined in the fun! June 18th is International Picnic Day and Louise has invited us for a picnic game for the month of June. The game is played by selecting a letter and make something to bring to the picnic beginning from your chosen letter. The chosen letter will be confirmed and assigned to each person by Louise, like in my case, I chose the letter W, and it is for Watermelon With Fresh Mint and Lime. And that's not all, each of us must list what the other persons before your letter, are bringing! It is like a kids'-game, exciting and fun!


 So refreshingly delicious!


Minty sweet with the tanginess of the lime, it's difficult to stop eating!

So what do I bring for a picnic? Something sweet, refreshing and would guarantee a hit with everyone! Watermelon With Fresh Mint and Lime would be perfect! Everyone loves watermelon, I have yet to find anyone who does not! Sweet, juicy, fresh with a light delicious crunch, especially when eaten cold right from the fridge, delightful! And to top it with minty lime syrup, heavenly! This is a perfect dessert to end a wonderful delicious picnic meal brought by all the lovely ladies at The Picnic Game. Louise will do a round-up on 1st July of all the yummies that everyone has brought. Meanwhile let's take a look at what we are bringing for our picnic .....


I'm going for a picnic and I'm bringing ......


A - Artichokes Steamed and Dressed with Mayonnaise
B - Baked Beans
C - Cauliflower Tabbouleh
D - Dunkin' Donuts
E  - Eggplant Casserole
F  - Frosty Summber Salad with  Cranberry, Pineapple and Beets
G  - Goat Cheese Mixed Green Salad with Cocoa Nibs
H  - Halibut Steaks with Salsa Verde
I   - Iced Coffee Two Ways
J   - Jubilee Sandwich
K  - Key Lime and Ambarella Juice
L   - Limoncello Biscotti
M  - Mini Meringue Kisses
N   - Nougat Brownies
O   - Ozark Pudding
P   - Paletas de Chabacano y Manzanilla
Q  - Quinoa Salad
R  - Raspberries and Pears Cobbler Pie
S  - Strawberry & Kiwi Chocolate Tart
T  - Thai Fish Cakes in Pita Pockets
U  - Udon Salad with Honey Sesame Lime Dressing
V  - Vegetable Salad with Lime Dressing
W - Watermelon With Fresh Mint and Lime
X  - Xim Xim de Galinha
Y  - Yam Bake
Z   - Zuchinni & Pineapple Bread and Zucchini Many Ways


Watermelon with Fresh Mint and Lime
(source from "Relaxed Cooking With Curtis Stone" by Curtis Stone)
1/3 cup sugar
grated zest and juice of 1 lime
1/4 cup thinly sliced fresh mint leaves
1/2 large oval watermelon

Stir the sugar, 2 tablespoons water, the lime zest, and 1-1/2 tablespoons of the lime juice together in a small heavy saucepan over high heat until the sugar dissolves and the syrup comes to a boil. Let the syrup cool completely, and then refrigerate it until cold.
Strain the chilled syrup into a small bowl and stir in the mint. Allow the mint to infuse into the syrup for at least  5 minutes.
Place the watermelon, cut side down, on a work surface. Using a large sharp knife, cut the watermelon horizontally to form a 2-inch-thick slab. (Reserve the remaining watermelon for another use). Trim away the rind, and then cut the slab into 2-inch chunks. Transfer the watermelon chunks to a large serving platter, keeping the chunks in a single layer and maintaining the shape of the slab. Pour the cold syrup over the watermelon, and serve.


Friday, June 22, 2012

Ensalada Mixta (Mixed Vegetable Salad with Lime Dressing) : IHCC

This week over at I Heart Cooking Clubs (IHCC) is all about salad, with the theme "Summer Salad" where we are cooking from Rick Bayless's recipes. Something cool and nourishing is definitely up my books, we are experiencing really hot and humid weather right now. It has not rained for weeks, well, it did rain yesterday, not a heavy downpour but just a light rain and it lasted for about only fifteen minutes, I do not count that as rained at all! And the weather gets even worse with the current haze going on! Some areas have been asked to go easy with the usage of water. Hopefully the rain will come very soon. 


Made some pasta for dinner today and this simple salad. This is a simple lime dressing with the combination of lime juice, olive oil, salt, pepper and chopped fresh coriander. I increased the chopped coriander to double the amount, as I really love corianders. And more black pepper too! 


Rick Bayless has given a number of mixed vegetable combinations and I have selected the one with red potatoes, carrots and eggs, simply because I have all the ingredients at hand. And I happen to love hard-boiled eggs in my salads!  :)
You may check out all the different combinations by Rick Bayless, just click on the link at the recipe below. Or create your own combination.


The carrots and red potatoes are steamed first, leave to cool and mix with the dressing, placed on top a bed of lettuce and sprinkle the top with the egg slices, some red onions rings and cheese.


The simple dressing is really refreshing and goes well with the vegetables. I really enjoyed this plate of lovely salad. In fact, I had this as my dinner today, it is quite filling actually, with potatoes and eggs. Did not eat the pasta that I've cooked for dinner, the hot weather is making me hot and restless, especially after being in the kitchen, cooking and cleaning up, and did not have the mood to eat anything else, but was really happy to have this plate of vegetable salad for my dinner! Yum!


Rick Bayless @IHCC button rounded


Please visit IHCC to see all the wonderful salads the others have come up with.


I'm sharing this post with :
Recipe Box 2 hosted by Bizzy Bakes
Full Plate Thursday hosted by Miz Helen's Country Cottage


Ensalada Mixta (Mixed Vegetable Salad with Lime Dressing)
(source from : Frontera, Rick Bayless)
The vegetables in this salad can be prepared 1 or 2 days in advance and then mixed with the dressing just before serving.
About 2 cups (total) :
carrots, peeled and sliced diagonally, 1/8 inch thick
small boiling potatoes like the red-skinned ones, sliced 1/8 inch thick
beets, peeled and sliced 1/8 inch thick (I did not use this)


Dressing :
3 tablespoons freshly squeezed lime juice
1/2 cup vegetable oil, preferably part olive oil
1/2 teaspoon salt
a generous 1/4 teaspoon freshly ground black pepper
1-1/2 tablespoons finely chopped fresh coriander (cilantro) or flat-leaf parsley (optional)


Garnish
6 leaves Romaine or leaf lettuce
1 small bunch of watercress, large stems removed (optional)
1 hard-boiled egg, sliced 1/8-inch thick
1 thick slice of red onion, broken into rings
2 tablespoons crumbled Mexican queso fresco or other fresh cheese like feta or farmer's cheese (optional)


Directions :
The vegetables : In a large saucepan, set up a vegetable steamer over an inch of water and set over medium-high heat. When the water begins to boil, place the prepared carrots, potatoes and/or beets in separate shallow piles on the steamer rack. (If using beets, keep them away from the others, or you'll have a lot red vegetables). Steam, tightly covered, until the vegetables are tender but still retain a little firmness, 8 to 12 minutes, depending on their cut and condition. If one vegetable is done before the other, remove it with a large spoon or tongs. Cool the vegetables in separate groupings on a large tray. 

The dressing : A few minutes before serving, measure the lime juice, oil, salt, pepper and optional fresh coriander or parsley into a small bowl or a jar with tight-fitting lid; whisk or shake until thoroughly blended. Pour onto the vegetables and mix well.

Garnish and presentation : Line a large serving platter with lettuce leaves. Once again, toss the vegetable mixture with the dressing, then scoop it onto the platter. Garnish the edges with the optional watercress. Top with slices of hard-boiled egg, rings of red onion, and a sprinkling of the optional fresh cheese.


Wednesday, June 20, 2012

Chicken with Ginger and Potatoes

There's nothing extra special or fancy at all about this dish. It is a homey, comforting dish to have as a main dish for a simple dinner at home with the family. With very simple ingredients, but good enough as a main dish on our dinner table. We would usually have this with plain white rice together with some stir-fried vegetables and perhaps a bowl of soup or a plate of omelette. 


We love potatoes, so I have added in more potatoes as usual! Everyone would dig in for the potatoes first! Sometimes I would add in some dried shiitake mushrooms as well. Most times I would cook it just like this.


This is a nice dish to serve to kids, they would love the potatoes and tender chicken meat, and some gravy to drizzle over the rice. The amount of ginger may be reduced if serving to kids.

I'm sharing this with :
Recipe Box Week 2 at Bizzy Bakes

Chicken with Ginger and Potatoes
half a chicken, remove skin and fats, cut to bite-sized pieces
1 tbsp cornflour
cooking oil
2" knob ginger, peeled and slice thinly
4 medium potatoes (peeled, halved and each half cut to three pieces)
1-2 tsp black soy sauce, depending on how dark you want the dish to be
3 tbsp light soy sauce, or to taste
1 tbsp oyster sauce
1/3 cup warm water
1 tsp sesame oil
  1. Marinate chicken pieces with cornflour. Set aside for 15 minutes.
  2. Heat about 3-4 tablespoons of cooking oil in a non-stick saucepan. Fry potato chunks on all sides until lightly browned. Remove and keep aside.
  3. In same saucepan, over medium heat, fry ginger slices until fragrant and lightly browned, about 2-3 minutes. Add in chicken pieces, stir well, cover saucepan for about 5 minutes, stirring occasionally.  Add black soy sauce, light soy sauce to taste, oyster sauce, stir and cover for another 5-7 minutes, stir once or twice. (Do not add water at this point, let the chicken meat release its own juices and cook itself in its juices for a few minutes).
  4. Add in potatoes, warm water, stir to combine, turn heat to low, cover and simmer for about 15 minutes, stirring occasionally, until chicken and potatoes are tender. 
  5. Add an additional 1/4 cup water if more gravy is preferred. Let it come to a simmer, drizzle with sesame oil, turn off heat and dish out to a serving plate. Enjoy!


Monday, June 18, 2012

The Miller's Cinnamon and Raisin Bread

This was one of the first breads that I've made when I bought the book "The Artisan Bread Machine" by Judith Fertig.  She got this recipe from a wheat miller in Kansas. And the miller says that people love their cinnamon and raisin bread because it has got a very soft, tender crumb. It has! Another keeper recipe!


I love the rich brown colour of the bread, mostly from the cinnamon powder and also some from the raisins that got mashed up during kneading  :o)


This is really easy and simple, kneading all done by the ever faithful bread machine. The recipe calls for all-purpose flour and vital wheat gluten, but I use bread flour and added in 1 teaspoon of dough enhancer, I omitted the vital wheat gluten as bread flour is used here. As usual, I let the machine do the kneading. The dough is really wet after a few minutes of kneading, I added in about a tablespoon of flour at a time but stop at about 1/3 cup of flour. At the sound of the beep, I gradually added in the raisins. Oops, I can see some of the raisins being mashed up during the kneading process. I guess that contributes more colour to the final bread! I took out the dough and put it directly into a greased loaf pan. The dough will be very soft and sticky, I sprinkled some flour onto the dough and with floured fingers, stretch the dough gently to evenly cover the pan. The pan I used is a little too small, use a bigger pan, refer my notes below, as it really puffs up within 30 minutes, almost spill over from the pan!


Bake in a preheated oven at 175C for about 28 minutes. Remove bread and transfer to a wire rack to cool completely.


This is one lovely bread, very tasty with soft tender crumbs, just as described by the miller. It stays soft the next day too, probably from the dough enhancer that I added in.  Good with a spread of salted butter and your favourite jam. 


I'm sharing this with :
BYOB, Bake Your Own Bread hosted by Girlichef
Recipe Box 1 hosted by Bizzy Bakes
Cookbook Sunday hosted by Couscous & Counsciousness


The Miller's Cinnamon and Raisin Bread
(adapted from "The Artisan Bread Machine" by Judith Fertig)
makes one 750gm loaf
3/4 cup milk
2-1/2 tbsp unsalted butter, softened
3 tbsp packed light or dark brown sugar
1-1/2 tsp salt
2 large eggs, beaten
2-2/3 cups all-purpose flour
1-1/2 tbsp vital wheat gluten
1-1/2 tbp ground cinnamon
1-1/2 tsp instant or bread machine yeast
2/3 cup raisins, plumped and drained *


  1. In a medium saucepan, scald milk over medium-high heat until bubbles form aound the edge. Remove from heat and stir in butter and brown sugar. Transfer to the bread pan and let cool to lukewarm. (between 86F and 95F / 30C and 35C)
  2. Add salt and eggs to the bread pan. Spoon flour on top of liquid. Add wheat gluten, cinnamon and yeast. Place raisins in the dispenser (or add at the "add ingredient" or "mix in" signal).
  3. Select the Basic/White Cycle and Light Crust setting and press Start.
** To plump raisins, place them in a bowl and add enough hot water to cover. Let stand for 15 minutes or untill plump. Drain well and let cool, then pat dry.


kitchen flavour's notes :
~ replace the all-purpose flour with bread flour.
~ omited vital wheat gluten because I use the bread flour, but added in 1 teaspoon dough enhancer.
~ the dough was really wet and I added in about another 1/3 cup of bread flour to the bread pan until the dough does not stick to the side of the pan, but still soft to touch. 
~ mixed the dough using the bread machine, at setting "Basic Dough". Add in the raisins gradually at the sound of the beep.
~ at the end of the cycle, transfer dough to a greased loaf pan, I used a 8-1/2x4-1/2 inch pan, which is a little too small, use preferably a slightly larger pan, perhaps 9x5-inch pan, or slightly larger. Dough will be very soft and sticky, I sprinkled some flour lightly over dough in pan, and with floured fingers, spread dough to fill up pan and level the top. Leave dough covered loosely with lightly oiled cling wrap for about 30 minutes or until it has puffed and risen to about 1inch above pan rim. Meanwhile, preheat oven at 175C.
~ Bake for about 25 minutes until done. Immediately transfer bread onto a wire rack to cool completely.


Saturday, June 16, 2012

Stir-Fry Pork with Green Onions

I was browsing thru my cookbooks on my bookshelf and felt rather guilty when I saw this Chinese cookbook that I bought almost 2 decades ago!  Yup, it's that long! Way before I was even married! Other than trying out maybe two or three recipes the most, this book has been sitting on my bookshelf, tucked away in between other books! I did not however, completely forgotten about this book, I know it's there, but well, just that I did not use it, that's all. :o(


To make myself feeling "unguilty" (my new word!!) about this book, I decided to cook this dish which was the first dish I've tried from this book a decade or so ago. At that time, I cooked it for just, me and my hubby, and  remembered it being a tasty dish. 


So now, I cooked it for my family, and just like I remembered it before, more than a decade ago, this is delicious. My kids love it. Really easy, quick with just a few simple ingredients. The important part is to tenderize the meat with a meat mallet so that it is soft and tender when fried. And the next important part is to season the meat well. To test, fry a small piece and taste. The meat should be tender, a little salty and sweet. I used double the amount of green onions as we all love green onions in my house! I added in a few slices of ginger, one of my favourite ingredient in Chinese stir-fries, I would eat up all the ginger and the green onions left on the plate!


The slices of marinated pork are pan-fry till brown and later stir-fry with a quick stir together with the ginger and green onions with a seasoning of soy sauce and sugar. Delicious with white steamed rice. I can see that this will be a repetitive dish in my kitchen! 


I'm sharing this with :
Cookbook Sunday hosted by Couscous & Consciousness
Recipe Box 1 hosted by Bizzy Bakes
Full Plate Thursday hosted by Miz Helen's Country Cottage
Weekend Potluck hosted by Life As A Lofthouse


Stir-Fry Pork with Green Onions
(adapted from "Chinese Cuisine" by Huang Su-Huei)
2/3 lb pork tenderloin

For Marinade :
1 tbsp soy sauce
1/2 tsp cooking wine or sherry
1/2 tsp water
1/2 tsp chopped garlic
1/2 tsp sugar
1 tbsp cornstarch

For Stir-frying :
1 cup green onion, cut into 2-inch pieces, separating the whites and greens
2 tbsp soy sauce
1/2 tsp sugar
8-10 slices ginger (my addition)

  1. Cut the tenderloin into 2/3-inch thick slices. Tenderize the slices with a meat mallet, mix with marinade ingredients.
  2. Heat wok or non-stick saucepan, then add 3 tablespoons oil, fry the meat slices until both sides are golden brown, remove and set aside.
  3. In a clean wok or saucepan, add about 1 tablespoon oil. Stir fry the ginger slices until fragrant. Add in the white part of the green onions, stir until fragrant, about a minute, add in the rest of the green onions, soy sauce and sugar to taste. Stir and add in the pork slices. Give a quick stir and dish out to a serving plate. Serve hot. Enjoy!

Thursday, June 14, 2012

Chewy Chocolate Almond Bars

This is a delightful chocolate almond bars, great for snacking. Made this for my nieces and nephew last week. These are made with simple ingredients that I'm sure are already in your pantry. Well, except maybe for the corn syrup, which is not an ingredient that is used in most bakes. 


One of the things I like about baking bars, slices or squares is that they are quick to make and quick to disappear! :)


I lined the baking pan with aluminium foil with two opposite sides overhang for easy removal. From my past experiences with bars and slices, it is always best to line the pan with aluminium foil even though the recipe only requires the pan to be greased. I find that sometimes the bars and slices tend to stick to the pan especially if they contain high sugar ingredients like jam, preserves and honey. And by using aluminium foil, it helps to prevent the sides of the bars touching the cake pan from burning or browning too fast.


As usual, I reduced the sugar for the topping, using only half the amount called for, and half of the corn syrup too. Believe me, you would not miss out on the sweetness, it is just right with the adjustment. And remember, choc chips are already sweetened! I replaced the almond extract with vanilla extract, as I'm not quite sure whether my nieces and nephew like almond extract, since almond extract is not everyone's cup of tea! When in doubt, use vanilla extract!!  


Why are these bars called chewy? I guess because when these bars are no longer warm, the almonds are no longer crunchy but a little chewy instead! Not that anyone is complaining! Most of the chocolate chips got all melted, coating the surface in a yummy way!


The bottom crust is like a shortbread, buttery and nice. A keeper recipe from one beautiful book!


I'm sharing this with :
Cookbook Sunday hosted by Couscous & Consciousness
Recipe Box 1 hosted by Bizzy Bakes
Full Plate Thursday hosted by Miz Helen's Country Cottage

Chewy Chocolate Almond Bars
(adapted from "Bake Something Great" by Jill Snider)
Crust
1 cup all-purpose flour
1/2 cup ground almonds
1/4 cup packed brown sugar (loosely packed)
1/2 cup cold butter, cubed

Topping
2 eggs
1/2 cup granulated sugar (1/4 cup)
1/2 cup corn syrup (1/4 cup)
2 tbsp butter, melted
1/2 tsp almond extract (replaced with vanilla extract)
1 cup milk chocolate chips
3/4 cup silvered almonds

Preheat oven to 350F (180C)
9-inch square cake pan, greased (I lined with aluminium foil, overhang on two opposite sides, for easy removal)

  1. Crust : In a bowl, combine flour, ground almonds and brown sugar. Using a pastry blender, 2 knives or your fingers, cut in butter until mixture resembles coarse crumbs. Press evenly into prepared pan. Bake in preheated oven until golden around the edges, 10 to 12 minutes.
  2. Topping : In a bowl, whisk eggs, sugar, syrup, melted butter and almond extract until well blended. Stir in chocolate chips and almonds. Pour evenly over crust.
  3. Return to oven and bake until set and golden, 25 to 30 minutes. Let cool completely in pan on rack. Cut into bars.

Tuesday, June 12, 2012

Pear And Maple Crumble : Free And Easy Bake-Along #26

It's time for our Bake-Along No. 26, the beginning of our second year of Bake-Along! I would like to thank everyone who has baked along with us in our previous "Bake Along 1st Anniversary Cake". Some of you even baked twice for this special theme! Thank you to all, for making Bake-Along a fun and delicious baking event that we look forward to each time! :o)

What is our bake this time round? Well, Lena has chosen Pear and Maple Crumble from Bon Appetit Desserts cookbook, a wonderful cookbook that is worthy of a place on your bookshelf, if you love to bake!  This is a very thick, heavy book with more than 600 recipes! So far we've tried a few recipes and  all are winners! 


For this crumbles, I've used a mixture of three different pears, one each of ripe Fragrant Pear (not in the photo), Packham Pear and Golden Pear. This recipe seems quite large, so I've only made three-quarters of the recipe using baking dish size 9"x6". I added in some lemon zest, since I only use half a lemon for the juice, I added in the zest as well, do not waste the lemony zest! I do not have pure maple syrup, what I have is maple flavoured syrup. Pure maple syrup is extremely expensive over here. I use salted butter for the crumbles and added in more walnuts. I mixed the flour, sugar and butter for the crumbles with a fork and added in the chopped walnuts, mixing the walnuts in with my fingers. I refrigerated the crumbles for about 15 minutes while I prepare the filling.


I'm really glad that I've used three different pears for the filling. It is very delicious eating the pear filling with three different tastes, yes, all the three pears taste very different from each other, and they are all good. It makes every spoonful interesting, with three different tastes and shades of pears. And I really like the crumbles, adding more walnuts is a very good idea! Walnuts are just perfect for crumbles topping, they are crunchy while still warm and even when the crumbles gets cold, the walnuts taste wonderful even if they are no longer crunchy. And I have used golden raisins for this, and did not use the crystallized ginger, simply because I do not have any in my pantry. I think the addition of crystallized ginger would be really good!


Even though the recipe recommended to eat this pear crumbles with sour cream, I think crumbles goes best with ice-cream! We had this with my homemade mango ice cream. Yummy! Overall, this Pear and Maple Crumbles is delicious! It is not too sweet since I've reduced the sugar slightly and absolutely divine with ice-cream!

Please do visit Lena and Zoe and all our friends who has baked along with us in the linky below.


Photobucket


For our next Bake-Along, we will be baking based on a theme. And the theme is Scones. Have you baked any scones before? If not, then this is the right time for you to do just that. You are free to bake any scones recipes you want.  Please do join us, the linky will start on 26 June right up to 2 July. See you!


Pear and Maple Crumble
(adapted from "Bon Appetit Desserts" by Barbara Fairchild)
Topping
1 cup unbleached all-purpose flour
1 cup walnuts
2/3 cup (packed) golden brown sugar
1/2 cup (1 stick) chilled unsalted butter, cut into 1/2-inch cubes

Filling
3-1/2 pounds firm but ripe Anjou pears, peeled, quartered, cored, cut into 1/2-inch cubes
2/3 cup pure maple syrup
1/2 cup raisins
2 tablespoons unbleached all-purpose flour
2 tablespoons fresh lemon juice
zest from half a lemon (my addition)
1 tablespoon finely chopped crystallized ginger
sour cream (to serve)

Topping : Combine flour, walnuts, brown sugar, and butter in processor. Using on/off turns, process until walnuts are coarsely chopped and small moist clumps form. Transfer toppig to medium bowl. Cover and chill until firm, about 1 hour.

Filling : Position rack in center of oven and preheat to 350F. Place pears, maple syrup, raisins, flour, lemon juice, and ginger in large bowl; toss to coat. Let stand 15 minutes, tossing occasionally.

Transfer pear mixture to 13x9x2-inch baking dish, sprinkle topping over. Bake crumble until pears are tender, juices bubble thickly, and topping is golden and crisp. about 30 minutes. Let stand at least 10 minutes. Serve warm with sour cream.

Join our blog hop, to get the codes, click on the below :
get the InLinkz code


Saturday, June 9, 2012

Picadillo Tacos : IHCC

What's for lunch? A delicious Mexican Picadillo Tacos. The theme at I Heart Cooking Clubs (IHCC) this week is "Wrap It Up" where we are currently cooking from the selected chef, Rick Bayless's recipes. I missed on last week's theme which is "Turn On The Grills", I bought some corns to grill, and the corns ended up being steamed instead, as I was really busy the last week and did not have time to grill the corns, in fact did not do any cooking at all. So I was really looking forward to this week's theme, even thought of making my own tortillas, but in the end, I ended up buying ready-made tortillas instead! One of these days, I am gonna try making my own tortillas!


Getting Mexican ingredients is really a challenge for me. The stores in the area where I'm staying do not have any Mexican sauces like the one above. I got this bottle of La Costena brand Homestyle Mexican Salsa from the special store which carries imported food, mainly catering to the expatriates living in Kuala Lumpur.  I actually bought this a few weeks ago, knowing that I'll be using this sooner or later. Most of the things there are quite expensive, since most of them are all imported. This bottle of sauce is however reasonably priced. I cannot find any of Frontera products (by chef Rick Bayless) over here, well, there are one or two more places that I have yet to check, keeping my fingers crossed!


I made this for lunch, and it was delicious. A simple filling of minced pork, salsa, onions, olives and raisins. I did plan on making some tortillas that afternoon. At the last minute, I realized that I did not thaw the vegetable shortening beforehand, for one of Rick Bayless's Tortilla recipe that I wanted to try, and my kids are getting hungry, me included! So as soon as I've cooked the filling, I went out to get some tortillas from the supermarket nearby! There are a few flavours to choose from, I bought the garlic tortillas.


To warm the tortillas for easy wrapping, simply place the pieces of tortilla on a microwavable plate, with a piece of lightly damp kitchen towel separating each piece,  microwave on high for 20 seconds. You will get nice soft warm tortillas.


This is delicious, even though it is a little bit spicy for my son, he managed to eat two of these with a glass of iced water!  The filling is really delicious, spicy from the salsa, a little saltiness from the olives and bits of sweetness from the raisins. I wrapped the filling up with some fresh green lettuce lining the tortillas. Definitely worth making again!

To see all the delicious wraps, hop over to IHCC


Rick Bayless @IHCC button rounded


I'm sharing this with :

Picadillo Tacos
(source from : Frontera, Rick Bayless)
Serves 4 to 6 as a taco filling
1 pound ground beef or turkey (I use ground pork)
1 small white onion, diced
1 jar (16 ounces) Frontera Chunky Tomato Salsa (mild) (I use La Costena Homestyle Mexican Salsa, Medium)
1/2 cup sliced green olives (I use stuffed olives with pimento)
1/2 cup raisins
2 tbsp brown sugar
2 tbsp ketchup
8 to 12 warm tortillas
chopped cilantro

  1. Cook beef or turkey and onion in a large skillet until browned, about 10 minutes. Stir in salsa, olives, raisins, sugar and ketchup. Cook until thickened, about 10 minutes. Season with salt.
  2. Serve in warm tortillas sprinkled with chopped cilantro.


Thursday, June 7, 2012

THB : Pear Pinwheel and Hazelnut Cake

It's time for our fourth bake at The Home Bakers (THB)! This fourth bake, Pear Pinwheel and Hazelnut Cake is chosen by my baking buddy, Zoe from Bake For Happy Kids. I think most of you would've already know Zoe, if you don't, then please drop by Zoe's wonderful blog with beautiful bakes and whilst you are there, take a look at a wonderful bi-monthly event started by Zoe, "Cook Like A Star". You can read all about this delicious event and join in!

Pear Pinwheel and Hazelnut Cake is categorized under Delectable Dessert Cakes in  the book "Coffee Cakes" by Lou Seibert Pappas, where THB is currently baking from. Under this category, ground nuts serve as flour, lending both body and flavour in some of the cakes. The toppings are either fresh fruits, nuts and even chocolate wafer, all these take the place of frosting. I have always prefer cakes without frosting, and would usually omit the frosting for most cakes.

Our fellow bakers at THB, has wonderfully given some tips and advices, when they made this cake earlier. Thank you gals! 


This recipe calls for Anjou or Bosc pears, both of which are not easily found over here, and it also depends on the seasonal availability from overseas. So I used ripe fragrant pears from China.  The pears are sliced and tossed with a mixture of icing sugar, ground nutmeg and ground cinnamon. They are then arranged on the cake batter in a pinwheel pattern before baking.


 The pinwheel pattern is attractive and it looks nice.


From the picture in the book, this is a fairly low cake, as it does not contain any leavening at all. It uses toasted hazelnuts, ground with  2 tablespoons of all-purpose flour.  I do not like to ground nuts, so I used store-bought ground hazelnuts, mixed with  2 tablespoons of flour.


As usual, I reduced the sugar as I did in most recipes, especially since my fellow bakers at THB has commented how sweet this cake is! For this, I only use 1/3 cup loosely packed brown sugar instead of 1/2 cup tightly packed as per the original recipe. This was supposed to be baked in a 9-inch springform pan, and seeing how the others comments about how low this cake is, I baked this in a 7-1/2-inch loose-bottomed pan, which works out great. Thanks for all the wonderful tips, gals!


Overall review : Moist nutty cake, however, it is a little too moist for me, the pears releases some of its juices and makes the cake especially moist.  The pears tasted nice with the mixture of icing sugar, nutmeg and cinnamon. Overall this is a nice cake. My daughter likes it, but I personally do not favour it much. 


Please do visit Zoe for the recipe and stop by THB to see our fellow bakers bake on this moist nutty cake.


Welcome to The Home Bakers


THB is currently baking from Coffee Cakes by Lou Seibert Pappas, if you would like to join in, please hop over to THB for details on how to become a member. Everyone's welcome!


Kitchen Flavour's notes :
~ use store-bought ground hazelnut
~ reduced brown sugar to 1/3 cup, loosely packed
~ replace almond essence with vanilla extract
~ baked in a 7-1/2 inch round loose-bottomed pan

Tuesday, June 5, 2012

Cauliflower Cheese Tart

Do you know that Cauliflower comes in yellow, orange, green and purple varieties besides the most common white ones?  I have seen perhaps the light green ones but have not seen the rest of the colours and am actually quite curious to find the purple and orange varieties, which I'm doubtful I can find it over here at all, at least not in my area.  Cauliflowers are packed with vitamins and nutrients and have no fat whatsoever, however do not eat more than 4 or 5 servings per week as it contains purines, which are broken down by the body to produce urid acid. Too much of urid acid in the body, could eventually lead to gout. Well, eat moderately and enjoy its benefits to the fullest! To know more about the health benefits of Cauliflowers, just google for info, you'll be surprised at how much health benefits this little veggie contains.  OK,  let's get on to the recipe.


I have been wanting to make Cauliflower Cheese Tart ever since I saw the recipe in a magazine. Many times I have bought some cauliflower for this purpose and each time it ended up stir-fried in my wok. But not this time! 


Do you like Cauliflower? We do! 


This is a lovely tart, it's meatless, only chunks of cauliflower, eggs and cheese. The recipe calls for a small amount of Grana Padano Cheese to be scattered on top, I have no idea what cheese it is, so I replaced that with Cheddar Cheese instead. I made my own shortcrust pastry, which you can get the recipe here, from my previous post, Cheese and Onion Quiche.


This is lovely for an afternoon lunch.  


Though this is lovely as it is, some pieces of chopped ham or bacon pieces added to the filling would be very delicious!


If you love cauliflower and cheese, then I'm sure you would like this, and if your household have picky eaters, perhaps some addition of bacon or chopped ham might be a good idea! 


I'm sharing this with :
Cookbook Sunday hosted by Couscous & Consciousness
Bake With Bizzy hosted by Bizzy Bakes


Cauliflower Cheese Tart
(adapted from "Olive" Magazine, December 2010 Issue)
shortcrust pastry (350gm) (I made my own shortcrust pastry, here)
cauliflower, 1 small head, broken into florets
2 tbsp plain flour
25gm butter
250ml milk
75gm cheddar cheese
1 tsp Dijon mustard
2 eggs
20gm grated grana padano (I use Cheddar cheese)

  1. Heat the oven to 190C/fan 170C/gas 5. Roll out the pastry to 20p thickness then line a 23cm tart tin. Line with baking parchment and fill with baking beans then bake for 15 minutes. Take out the paper and beans and bake for another 5 minutes.
  2. Cook the cauliflower in salted boiling water until tender, about 5-6 minutes. Drain well.
  3. Put the flour, butter and milk in a pan. Heat, whisking all the time until it comes to a simmer and begins to thicken. Cook for 3 minutes then add the cheese and stir until melted. Cool a little then stir in the mustard and eggs. Add the cauliflower and stir well, then season.
  4. Spoon the mix into the tart case, scatter over the grana padano, then return to the oven for 20 minutes, or until golden brown. Serve warm.