Friday, November 29, 2013

Phat Kuaytiaw Raat Naa Muu (Stir-Fried White Noodles with Pork)

Made this Phat Kuaytiaw Raat Naa Muu (Stir-Fried White Noodles with Pork) for lunch last week. We call this white noodles Kuay teow over here in Malaysia, and I am surprised that it is called the same in Thai. I cooked kuay teow very often, but have never added in Kai Lan before. And from what I've seen and read from various Thai recipes for fried Kuaytiaw, Kai Lan is the veggie that is frequently used for this noodle dish.


The kuaytiaw looks like "chee cheong fun" in the photos! 

An easy meal to make, cooked in just minutes. The kuaytiaw is first seasoned with a little light soy sauce while separating the noodle pieces and they are stir-fried in a little oil until they are beginning to brown a little. Remove to a serving plate.Then the sauce is cooked and poured over the kuaytiaw, serve immediately, with some seasoning condiment.


Nam Jim Aahaan Thaleh (Garlic and Chilli Sauce)


This is quite delicious! The sauce uses yellow bean paste, oyster sauce, light soy sauce, sugar, tapioca flour and water, which are all mixed until smooth. Sliced pork fillet is stir-fried with some garlic until cooked about 3-4 minutes, then Kai Lan is added in, followed by the sauce. Stir everything to combine, adjust the seasoning and pour the sauce mixture over the pre-fried kuaytiaw. Serve hot and enjoy.


Phat Kuaytiaw Raat Naa Muu (Stir-Fried White Noodles with Pork)
(adapted from "Food of Thailand")
2 teaspoons oyster sauce
6 teaspoons light soy sauce
1 teaspoon sugar
2 teaspoons yellow bean sauce
1 tablespoon tapioca flour
450gm (1 lb) wide fresh flat rice noodles
4 tablespoons vegetable oil
4-5 garlic cloves, finely chopped
225gm (8 oz) pork or chicken fillet, finely sliced
175gm (6 oz) Chinese Kale, cut into 1 inch pieces, leaves separated
ground white pepper, for sprinkling

  1. Mix the oyster sauce, 4 teaspoons of the light soy sauce, sugar, yellow bean sauce and tapioca flour with 125ml (1/2 cup) water in a bowl.
  2. Put the noodles in a bowl with 2 teaspoons of the soy sauce and rub the sauce through the noodles, separating them out as you do so.
  3. Heat 2 tablespoons oil in a wok or frying pan over a medium heat and stir-fry the noodles for 4 to 5 minutes or until the noodles are browning at the edges and beginning to stick. Keep them warm on a serving plate.
  4. Heat the remaining oil in a wok or frying pan and stir-fry the garlic over a medium heat until light brown. Add the pork and stir-fry for 2 to 3 minutes or until the meat is cooked. Add the stalks of Chinese kale and stir-fry for 1 to 2 minutes. Add the sauce mixture and the top leaves and stir together for another minute or so. Taste and adjust the seasoning if necessary.
  5. Spoon the pork and Chinese kale on top of the noodles and sprinkle with white pepper. Serve the seasoning ingredients in small bowls on the side, for adjusting the flavour.

Seasoning :
Naam Jim Aahaan Thaleh (Garlic and Chilli Sauce)
4 garlic cloves, finely chopped
3 bird's eye chillies, mixed red and green, stems removed, lightly crushed
2 tablespoons lime juice
1 tablespoon fish sauce
1 teaspoon sugar

Mix all the ingredients together in a small bowl. The sauce can be stored in a jar in the refrigerator for several weeks.


Lena from frozen wings is hosting Asian Food Fest (Thailand) for this month, cook any food from Thailand and link your post. Drop by Lena's for more info about joining in this delicious event.


" I am submitting this post to Asian Food Fest ( Thailand ) - November Month hosted by Lena of frozen wings


I'm sharing this post with :

 photo 77951578-1914-4b72-8eda-9e40a91183ac_zps331eb4b4.jpg

Wednesday, November 27, 2013

Herby Mustard Chicken : IHCC

"Easy Entertainning", our theme for this week at I Heart Cooking Clubs (IHCC), where we are currently cooking from Donna Hay's recipes. This week is all about "Hosting made simple - dishes perfect to serve to guests but easy to prepare", and this Herby Mustard Chicken is just  so simple and so easy!!


Originally, this chicken meal is served with Olive Oil Mash, but instead of making that, I have served the chicken with some Potato Salad and some Broccoli instead. I've made two or three slits on the chicken thighs pieces, and marinated with lots of chopped parsley and chopped rosemary leaves, with some hot English mustard, white wine vinegar, garlic salt and black pepper. According to the recipe, the chicken pieces are marinated with the herbs for 15 minutes, but I have keep the chicken pieces in the refrigerator for about an hour or so.

And, the chicken pieces are supposed to be pan-fried in the saucepan until cooked through, but I have opted for an easier way of cooking the chicken, baked it in the oven instead. This way, I do not have to stand over the stove to pan-fry the chicken and also less cleaning up to do. I simply line the baking tray with foil, arrange the chicken pieces in a single layer and baked them till done, about 40-45 minutes. I baste the chicken with all the juices that has accumulated in the baking tray twice during the baking time. Simple and easy! And while these are baking, I made the Potato Salad and the Broccoli, and everything is ready by the time the chicken pieces are cooked through. Easy and simple!

The chicken is tender, moist and delicious! 

Herby Mustard Chicken
(adapted from donnahay.com)
1 cup chopped flat-leaf parsley leaves
2 teaspoons hot English mustard
2 cloves garlic, crushed
1 tablespoon chopped rosemary leaves
1/2 cup (125ml) olive oil
2 tablespooons white wine vinegar
sea salt and cracked black pepper
8x120gm chicken thighs, bone in and skin on

Combine parsley, mustard, garlic, rosemary, oil, vinegar, salt and pepper. Add chicken and toss to coat. Set aside for 15 minutes.
Heat a large non-stick frying pan over medium heat. Cook the chicken for 6-8 minutes on each side or until cooked through. Spoon over the pan juices and serve with the mash.
(I baked the chicken in the oven at 200C for 40 minutes until cooked through).


Drop by I Heart Cooking Clubs (IHCC) to see what the others are cooking.

Monday, November 25, 2013

Italian Almond Tart : Bake-Along #55

Bake-Along #55, Italian Almond Tart, is selected by Zoe of Bake For Happy Kids, and I'm so glad that this tart is selected. It is really good.

Almonds and walnuts are two of my most favourite nuts when it comes to baking, and I love most bakes that uses ground almonds. This recipe calls for almond paste, an ingredient that I really like, which makes the bake, moist with nutty almond flavour. I have made my own almond paste, which is really very easy and takes only 5 minutes. To make the almond paste, please refer to my post here.


This tart starts with the pastry which is to be blind bake, partially cooked, before it is spread with the jam and filling for the final baking.


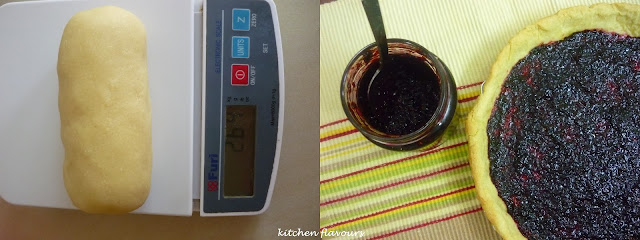
Homemade Almond Paste, which I've used all 264gm. And Homemade Mulberry Jam. Spread an even layer of any of your favourite jam over the base of the partially baked pastry.


The filling is a mixture of the Almond Paste, eggs, butter, flour and sugar. Once the filling is made, spread it out onto the partially baked pastry, over the jam, and sprinkle the flaked almonds over the top. Bake until filling is golden brown and the middle is firm, about 40 minutes. I tent the top with foil at 30 minutes into baking, as the top is browning too fast and the middle is not fully cooked yet. 


This is one yummy almond tart. The filling is moist, very tasty, nutty and very fragrant from the almond paste, slightly sweet and goes well with my homemade Mulberry Jam which is a little tart. The sweetness from the filling and the slight tangy jam blends perfectly together. And the crust pastry is buttery and crispy tender, though if I were to use this for other tart making, I would probably reduce the sugar slightly.


Overall review : Very good! These tarts are suitable for freezing. I freeze the leftovers wrapped in individual cling wrap. Remove cling wrap, thaw,  wrap in aluminium foil and reheat in the oven for about 10 minutes. 


Italian Almond Tart
(adapted from "The Williams-Sonoma Baking Book")
Makes one 9-1/2-inch tart, or 8 servings
Basic Tart Dough (refer below)
1/2 cup (4oz/125gm) unsalted butter, at room temperature
1/2 lb (250gm) almond paste, cut into 1-inch cubes
1/4 cup (2oz/60gm) sugar
2 large eggs
1/3 cup (2oz/60gm) all-purpose flour
1/3 cup (3-1/2oz/105gm) raspberry, plum, or cherry jam
1/3 cup (1-1/2oz/45gm) sliced (flaked) almonds

Roll out the dough disk into a 12-inch (30cm) round. Transfer the dough round to a 9-1/2-inch (24cm) tart pan, preferably with a removable bottom. Trim off any excess dough by gently running a rolling pin across the top of the pan. Press the dough into the sides of the pan so that it extends slightly above the rim. Refrigerate or freeze the tart shell until firm, about 30 minutes.

Meanwhile, place an oven rack in the lower third of the oven and preheat to 375F (190C). Partially blind bake the tart shell as directed below. Transfer the tart shell to a wire rack. Place an oven rack in the middle of the oven, and reduce the oven temperature to 350F (180C).

In a bowl, using an electric mixer on medium speed or a whisk, beat the butter until smooth. Add the almond paste, one piece at a time, beating until smooth after each addition. While continuing to beat, sprinkle in the sugar. Add the eggs one at a time, mixing well after each addition. Stir in the flour.

Spread the jam evenly in the bottom of the partially baked tart shell. Spoon in the almond paste mixture and spread evenly over the jam. Sprinkle the surface evenly with the sliced almonds.

Bake until the filling is golden and the middle is firm, 35-40 minutes. Transfer the tart to a wire rack and let cool completely. If using a tart pan with a removable bottom, let the sides fall away, then slide the tart onto a serving plate. Serve at room temperature.

Basic Tart Dough
1 large egg yolk
2 tbsp ice water, plus more if needed
1 tsp pure vanilla extract
1-1/4 cups (6-1/2oz/200gm) all-purpose flour
1/3 cup (3oz/90gm) sugar
1/4 tsp salt
1/2 cup (4oz/125gm) cold unsalted butter, cut into 1/4-inch (6-mm) cubes

Using the food processor :
In a small bowl, stir together the egg yolk, the 2 tbsp water, and vanilla. In the bowl of a food processor, combine the flour, sugar, and salt and pulse to blend. Add the butter and pulse until the mixture resembles coarse meal with butter pieces no larger than small peas. Add the egg mixture and pulse just until the dough pulls together. If the dough is dry, mix in more water 1 tbsp at a time.
Roll out the dough as directions in the recipe above.

For Blind Baking :
Place an oven rack in the lower third of the oven and preheat to 375F (190C). Remove the pastry shell from the refrigerator or freezer. Line with a sheet of aluminium foil or parchment (baking) paper large enough to overhang the sides, patting the foil into the bottom and up the sides. Cover the bottom of the shell with a generous layer of pie weights or raw-short grain rice on top of the foil. The weights help prevent the pastry from shrinking during baking.
For a partially baked pie or tart shell, bake for 20 minutes, then lift an edge of the foil to check the dough. If it looks wet, continue to bake, checking it every 5 minutes, until it is pale gold. The total baking time will be 25-30 minutes.

Almond Paste
For my own record :
To make about 250gm of almond paste :
150gm ground almond
90gm sifted powdered sugar
1 to 1-1/2 tablespoon egg white (adding a little at a time as needed to form a dough)
1/2 tsp almond extract
1/8 tsp salt
Mix everything together and knead to a dough. Use as directed or can be frozen.


To join our blog hop, bake this Italian Almond Tart and link your post to our Bake-Along linky.
Please visit my baking buddies, Lena from Frozen Wings and Zoe from Bake For Happy Kids, and all our friends who has baked along with us in the linky below :

For our next Bake-Along, we will be baking based on a theme. Since Christmas is just round the corner, our theme for Christmas is "Theme : Christmas Log". Bake any Christmas Log and link your post to the our blog-hop linky which will start on 23rd December right up to 31st December. Everyone is welcome! 


Photobucket


A friendly reminder when linking to our blog hop :
1. Please mention Bake-Along event in your own post linking direct to any of the hosts' post (JoyceLena or Zoe)
2. Please link only new and current post, related to the current bake or theme provided by us. Unrelated post will be deleted.
3. Feel free to display our Bake-Along badge in your post.


To join our blog hop, click on the link to get the codes :
get the InLinkz code

Friday, November 22, 2013

Black Mulberry Jam

I made this Mulberry Jam a couple of months ago actually. I have been collecting black mulberries from my kind neighbour's tree plus some from my own small mulberry plants (not trees!) grown in pots, and have collected enough to make a batch of jam. 


Frozen Mulberries


Homemade mulberries jam.

I have used a hand-held blender to puree the mulberries, as mashing them with a potato masher is not that easy after all. Since the jam already contained powdered pectin in the ingredients, go easy on the lemon juice, as the mulberries are already slightly sour.


Gave one jar to my kind neighbour.


Perfect on bread, with some salted butter, makes a lovely breakfast with a cup of hot coffee.


Black Mulberry Jam
(adapted from "The Blue Chair Jam Cookbook" by Rachel Saunders)
1 pound white cane sugar (I use about 300 gm)
1/3 ounces powdered apple pectin (about 10gm)
3 pounds black mulberries (I use about 1.5kg)
2 ounces freshly squeezed lemon juice (I use 1-1/2 tablespoons)

Place a saucer with five metal teaspoons in a flat place in your freezer for testing the jam later.

In a bowl, combine the sugar and pectin and whisk well to evenly distribute the pectin granules throughout the sugar. Place the mulberries and lemon juice in an 11- or 12-quart copper preserving pan or a wide nonreactive kettle and immediately pour the sugar-pectin mixture over the fruit, stirring as you pour to prevent the pectin from clumping.

Place the pan over medium-low heat and cook, stirring constantly, until the juice begins to run from the berries. Increase the heat to high and continue to cook, stirring very frequently, until the mixture boils. At this point, lower the heat slightly, maintaining a boil.

Mash half to three-quarters of the fruit with a potato masher. Boil the mixture for 10 to 15 minutes, stirring frequently. Begin testing for doneness after 10 minutes.

To test for doness, carefully transfer a small representative half-spoonful of jam to one of your frozen spoons. Replace the spoon in the freezer for 3 to 4 minutes, then remove and carefully feel the underside of the spoon. It should be neither warm nor cold; if still warm, return it to the freezer for a moment. Tilt the spoon vertically to see whether the jam runs; if it is reluctant to run, and if it has thickened to a near-jelly consistency, it is done. If it runs very quickly, cook it for another few minutes, stirring, and test again as needed.

Pour the jam into sterilized jars.


my notes :
  • did not do the jam test. I cooked the jam until it has thickened to the consistency I want. Take note that it will thicken further upon refrigeration.  I like my jam to be a little on the runny side, so adjust to your own preference.
  • advisable to add in about 1 tablespoon of lemon juice first, and add accordingly, as the more sour it is, you will tend to add in more sugar!
  • Instead of using the potato masher to mash the mulberries, I have used a hand-held blender instead.
  • Yields about 2-1/2 jars of 250ml-sized jars.

Thursday, November 21, 2013

Stuffed Cucumber Kimchi

Kimchi is Korea's national dish and there are different varieties of kimchi, depending on the regions and seasons. Kimchi is one of my favourites. I would never fail to order kimchi soup when we eat out at Korean restaurants. And have always wanted to try my hands at making my own kimchi, the traditional ones using cabbages, but I have yet to do so! When I was browsing thru one of my cookbooks "The Best of Asian Cooking", this recipe, in the Korean section for Vegetables and Salad, caught my attention. I love eating cucumber, which are always great in pickles, and these quick kimchi style pickled cucumbers sounds good to me. 


Stuffed Cucumber Kimchi are very easy to make, only thing is, make this about 5-6 hours in advance, keep them pickled in the refrigerator and enjoy them later!


I use only 1 Japanese cucumber as I am eating this alone. This is too spicy for the kids and hubby does not like kimchi! Haha, more for me to enjoy! 
For the cucumber : smoothen cucumbers by rubbing salt all over. Rinse and pat dry. Cut off about 1/2 inch from both ends of cucumber and discard the ends. Cut cucumber to 2-3 inch lengths. Stand cucumber slices cut side up. Make a slit across one side, but do not cut through. Sprinkle with some salt, set aside.
For the kimchi paste ; carrots, onions, ginger, chives and garlic are chopped finely. Mix all paste  ingredients together in a bowl with some fish sauce, chilli powder, stir to combine. 
To stuff : Squeeze gently excess water from cucumber. Fill the cavity with the kimchi paste.
Place in a bowl, and sprinkle the balance paste on the cucumbers. Keep refrigerated for 5-6 hours.


Six hours later. Enjoy!
This is SPICY, crunchy, salty!
I ate two as an appetizer at dinner time. And even great as a pickled filling for a sandwich. I sliced them up and use it for my egg sandwich for lunch. 


Stuffed Cucumber Kimchi
(source from "The Best of Asian Cooking")
3 Japanese cucumbers
60gm Kosher or sea salt

Stuffing :
45gm Chinese chives, finely chopped
30gm carrot, finely chopped
3 garlic cloves, peeled and finely chopped
2 slices ginger, finely chopped
3 tbsp fish sauce
2 to 2-1/2 tbsps chilli powder

  1. Smoothen cucumbers by rubbing with some salt.
  2. Cut 1-cm (1/2-in) off each end of cucumbers and discard. Slice cucumbers into 6-8cm (2-3in) lengths.
  3. Stand cucumbers on a cut side. Make a cut across one side of cucumbers but to not cut through. Sprinkle remaining salt on cucumbers. Set aside.
  4. Combine stuffing ingredients and mix well.
  5. Gently squeeze excess water from cucumbers or dry with a clean towel. Fill cavity with stuffing.
  6. Refrigerate stuffed cucumbers for 5-6 hours before serving. The stuffed cucumbers can be kept for up to 5 days in the refrigerator.


I'm submitting this post to Aspiring Bakers #37 : Korean - Feast of Hansik (Nov 2013) hosted by Grace of Life Can Be Simple


I'm sharing this post with :

 photo 77951578-1914-4b72-8eda-9e40a91183ac_zps331eb4b4.jpg

Wednesday, November 20, 2013

Honey Oatmeal Bread

This is another lovely bread from Bernard Clayton's New Complete Book of Bread. Originally, this bread is called Maple Oatmeal Bread, and it uses maple syrup, all 3/4 cup for two loaves of bread. Since I do not have any maple syrup, I have used honey instead, and reduced the amount slightly. I've made only half a recipe for 1 loaf of bread.


A soft bread with light golden crust, with just a hint of sweetness from the honey.


Rolled oats is soaked in some boiling water for an hour. The softened roll oats are then mixed with the rest of the ingredients, honey, salt, cooking oil and some flour, mixed to a stiff batter.  Cover with cling wrap and leave until doubled in size, about 1 hour.

Add the rest of the flour, 1/2 cup at a time to the risen doughy batter and knead until the dough leaves the sides of the mixing bowl. In total I have used about 3 cups of bread flour. Shape the dough into a loaf and placed in a greased loaf pan, 8" x 4-1/2", covered with greased cling wrap and leave to rise until it reaches the rim of the loaf pan. Preheat the oven about 15 minutes before baking, at 350F. 


This bread is baked in  a moderately low temperature oven for 40-50 minutes to allow the bread to rise further into a light brown loaf. It rises really well during the first 20 minutes of baking.


It bakes up beautifully with a light golden crust. The bread has a light sweetness in taste from the honey and the oats are blended into the dough, which gives a soft and nice bread texture. Just as the author says, "An admirable loaf"!

Maple Oatmeal Bread
makes 2 loaves (8"x4") (my measurements in blue is for one loaf)
2-1/2 cups boiling water  (1-1/4 cups)
1 cup quick or regular rolled oats (1/2 cup)
1 package dry yeast (1 tsp plus 1/8 tsp)
3/4 cup maple syrup (1/4 cup honey)
2 teaspoons salt (1/2 tsp)
1 tablespoon cooking oil (1/2 tbsp)
5 cups bread or all-purpose flour, approximately (3 cups)

Baking pans : 2 medium (8" x 4") loaf pans, greased or Teflon
  1. In a large bowl, pour the boiling water over the oatmeal and set aside to soak for 1 hour. Sprinkle the yeast over the cooled oatmeal and stir to mix. Add the maple syrup (honey), salt, cooking oil and 3 cups (1-1/2 cups) of flour. Blend all the ingredients. It will have the consistency of a heavy batter.
  2. Cover the bowl with plastic wrap and set aside to rise for about 1 hour.
  3. Add additional flour, 1/2 cup at a time, to form a dough that can be lifted from the bowl and placed on the surface to knead until the dough is smooth and elastic, about 10 minutes. Add more flour if the ball of dough is sticky. The dough may also be placed under a dough hook in a mixer for an equal length of time. The dough should clean the bowl in the final stages of kneading. (I use the stand mixer to knead the dough until smooth, about 20 minutes, with an additional 1-1/2 cups of flour, about 3 cups in total).
  4. Divide the dough into 2 pieces and shape into loaves. Drop each into a prepared pan. Push the dough into the corners.
  5. Cover the pans with wax or parchment paper and leave at room temperature until the dough reaches the edge of the pan, about 45 minutes.
  6. Preheat the oven to 350F, about 15 minutes before baking.
  7. This is a fairly slow oven, so allow 40 to 50 minutes for the bread to bake into a light brown loaf. Midway through baking, turn the pans end for end to balance the heat on the loaves. Turn one loaf out of its pan and tap the bottom crust with a forefinger. A hard, hollow sound means the bread is baked. If not, return to the oven for an additional 5 or 10 minutes. (If using a convection oven, reduce heat 50 degrees).
  8. Remove the bread from the oven and turn the loaves from the pans. Place the loaves on a metal rack to cool before serving. The bread toasts beautifully. It can be kept frozen for an indefinite period at 0 degrees. An admirable loaf.

This post is linked to the event, Little Thumbs Up, organized by Zoe from Bake For Happy Kids and Doreen from My Little Favourite D.I.Y, hosted by Vivian from Vivian Pang's Kitchen

Photobucket


I'm sharing this post with :

 photo 77951578-1914-4b72-8eda-9e40a91183ac_zps331eb4b4.jpg


Monday, November 18, 2013

Lemony Chicken with Fresh Coriander : IHCC Potluck

"November Potluck" is this week's theme at I Heart Cooking Clubs (IHCC), where we are currently cooking from Donna Hay's recipes. For this monthly Potluck theme, we are however, free to select any recipes from our previous featured chefs, and for this week, I'm cooking with Madhur Jaffrey.

Are you a fan of fresh corianders? I am. I really like eating this herb veggie, either used in cooking or fresh as a garnish, which I would usually use heaps of it. So when I saw this recipe of Madhur Jafrrey's, using fresh corianders, and lots of it, I knew that I just had to make this dish! Especially so when I read an excerpt from the recipe that says : 

"Taken from the expanded new edition of her classic best-selling book, Madhur Jaffrey's Indian Cooking, this is the recipe that Jaffrey says took the spice out of a major city in England. As she explains it : "My new book was first published in England, by the BBC. Shortly after it came out, The Manchester Guardian ran a story which said that the city had run out of fresh spices : Everyone was making Lemony Chicken with Coriander"! 

Curiosity got the better of me, and I just had to try this popular dish!


Lemony Chicken with Fresh Corianders


A big bunch of coriander leaves and tender stems goes into the dish.


The roots with the bottom stems stills attached, do not waste these! These can be frozen, wash them clean thoroughly, dry them and place in a zip-lock bag, keep in the freezer. Great for Thai recipes, which uses these extremely fragrant roots in many of the recipes. I have one Thai recipe which I've wanted to try, and these will come in handy!


This is a fairly easy dish to prepare. Chicken pieces are browned in a little oil and kept aside. Minced garlic are sauteed till light brown, add the ginger paste, stir and add in the chopped corianders, cumin powder, turmeric powder, coriander powder, chilli powder, chopped jalapeno, salt and stir for a minute. The fragrance of the coriander and the spices are extremely aromatic at this point. Add in the chicken pieces, some water and lemon juice to taste. Stir, bring to boil, cover pan, turn heat to low and simmer for 15 minutes, turn chicken pieces over and simmer for another 15 minutes. 

Note : I have however used a little extra of all the spices, like I always do, as I love dishes like this with bold flavours and usually with a little more sauce or gravy.


The dish should be fairly dry with the chicken pieces coated with the coriander sauce.

Very nice eaten with white rice. This is a fairly mild dish, the amount of chiili or cayenne powder can be increased for a spicier dish. The next time when I make this again, I would skip the frying of the chicken and cooked it directly into the sauce instead, it's just that I prefer the chicken meat to be more tender and soaked up all the flavours from the spices. And yes, this is one dish that I would make again.


Lemony Chicken with Fresh Coriander
(adapted from here)
2 - 1" cubes fresh ginger root, coarsely chopped
1/4 cup water
2/3 cup water
1135gm chicken breasts - skinned (half a chicken + 2 drumsticks)
5 cloves garlic, minced
200gm cilantro, minced (250gm)
1/2 jalapeno, minced (1 whole jalapeno)
1/4 teaspoon cayenne (1/2 tsp chilli powder)
2 teaspoons cumin powder (3 teaspoons)
1 teaspoon coriander powder (1-1/2 teaspoons)
1/2 teaspoon turmeric (3/4 teaspoon)
1 teaspoon salt
2 tablespoons lemon juice (juice from half a lemon)

Put the ginger and 1/4 cup water into a blender or processor. Blend until you have a paste.

Put the oil in a wide, heavy, preferably nonstick pan over medium-high heat. When the oil is hot, put in as many chicken pieces as pan will hold in a single layer, and brown on both sides. Remove the chicken pieces with a slotted spoon and put them in a bowl. Brown all the chicken pieces this way.

Add the garlic to the hot oil. As soon as the pieces turn a medium-brown colour, turn heat to medium and pour in the ginger paste. Stir-fry it for a minute. Now add the fresh coriander, jalapeno, cayenne, cumin, coriander, turmeric, and salt. Stir and cook for a minute.

Put in all the chicken pieces as well as any liquid that might have accumulated in the chicken bowl. Add 2/3 cup water and the lemon juice. Stir and bring to a boil. Cover tightly, turn heat to low, and cook for 15 minutes.

Turn the chicken pieces over. Cover again and cook for another 10 to 15 minutes or until the chicken is tender. If the sauce is too thin, uncover the pan and boil some of it away over a slightly higher heat.

********

This post is linked to I Heart Cooking Clubs (IHCC). Do drop by IHCC to see what my friends are cooking for this week's Potluck Theme.


And I'm sharing this with :


Saturday, November 16, 2013

Creamy Mushroom Pasta

I have heard of Bill Granger and have seen his cookbooks, and that is as much that I know of, about this Australian food writer. I don't even remember ever watching any of his cooking shows on TV. From what I've read from various websites, he is a self-taught cook, a restaurateur and food writer. He is very popular in Australia and has a large following of fans. I could be one too, well, at least for this pasta dish that I'v tried.


This pasta dish is very simple and quick to make. The recipe uses dried porcini mushrooms, since it is not available in the area where I live, I have substitute with dried shiitake mushrooms instead. I have no idea how dried porcini tastes like, never tried them before, but the dried shittake mushrooms works out great, for me.

I have used white button mushrooms and garnish with fresh thymes from my garden, since I do not have any parsley at hand. Recipe uses zest of one lemon and some lemon juice to taste, if you are making this pasta, do not skip the lemon, it really brings out the flavour of this pasta dish!

I have used linguine instead of pappardelle, as I always have a pack or two of linguine and spaghetti in my pantry. While the pasta is boiling, prepare the creamy mushroom sauce, which takes only minutes to cook. I have used a little more water from the soaked mushroom and more cooking cream than the recipe calls for, as my kids like to have their pasta a little "saucy"! Drain the cooked pasta and toss in the creamy mushroom sauce, serve immediately, garnish with either fresh chopped parsley or fresh thymes.


Review : A delicious pasta dish. Really well-liked by my kids and myself included. Simple and delicious, I would definitely make this again. Am I a fan of Bill Granger yet? I'm getting there! And I like his Chicken Drumstick with Paprika Garlic


Creamy Mushroom Pasta
(source from : independent.co, Bill Granger)
30gm /1-1/4oz dried porcini mushrooms (replaced with dried shiitake mushrooms)
300gm / 10oz pappardelle pasta
50gm / 2oz butter
1 tbsp olive oil
500gm / 1lb mixed mushrooms, roughly chopped
2 garlic cloves, chopped
1 tbsp lemon thyme
zest of 1 lemon, plus a squeeze of juice
100ml / 3-1/2fl oz single cream
handful flat-leaf parsley, chopped

Soak the dried porcini in 75ml/3 fl oz boiling water for 15 minutes. Drain, reserving the soaking liquid and roughly chop the porcini.
Cook the pasta according to packet instructions. While the pasta cooks, heat the butter and oil in a large, non-stick frying pan, add the mixed mushrooms and fry over a high heat for 3 minutes. Tip in the soaked porcini, garlic and thyme and cook for a further 2 minutes.
Strain the porcini liquid into the pan with the lemon zest and juice. Season well, remove from the heat and stir in the cream and the drained pasta. Finish with the parsley and serve.


I'm linking this post to Cook Like A Star : Nov/Dec featuring Bill Granger, hosted by Zoe of Bake For Happy Kids, Yen of Eat Your Heart Out and Mich of Piece of Cake.


Thursday, November 14, 2013

THB : Sticky Caramel Pinwheel Cake

The Home Bakers (THB), bake #27 is Sticky Caramel Pinwheel Cake, selected by the lovely Jasline of Foodie Baker.

Firstly, I shall call this a bread! Jasline has picked a fine one, this bread is a total winner!


The dough uses milk which contributes to the soft and fluffy texture of the bread. The dough is very sticky to begin with and I ended up using  more flour than the recipe calls for. It was actually still a little sticky, but after kneading for about 20 minutes until the dough is smooth, and after the first stage of rising, it was easier to handle with a light sprinkling of flour. I have however reduced the sugar by almost half for both the dough and the caramel as I feel that the original amount is a lot, and do not want an overly sweet bread.

To make the gooey sticky caramel, firstly preheat the oven. Lightly greased the baking pan, put the butter, corn syrup and brown sugar in the pan, and place it in the oven until the butter melts and mixture bubbles. Remove from oven, spread mixture evenly on base of pan and leave to cool to room temperature.


After the first rising, the dough is rolled to a rectangle and spread with melted butter, and sprinkle with sugar-cinnamon mixture, of which I have added a tablespoon of sifted cocoa powder. Roll the dough up and cut into 16 pieces. Place these pieces, cut side up onto the prepared baking pan on top of the cooled caramel, which will be hardened by now. Cover the rolls with greased cling film and leave to rise until doubled in size.

The author has given a choice of baking these in a rectangular pan or a 14" round pizza pan (with a 1/2-inch rim) to make into a big round coffee cake. I wanted a round bread, so I baked these using the biggest pizza pan I have, a 12-inch size, which turns out a little too small! By the time the rolls rises, they almost pop out of the pan! Haha!

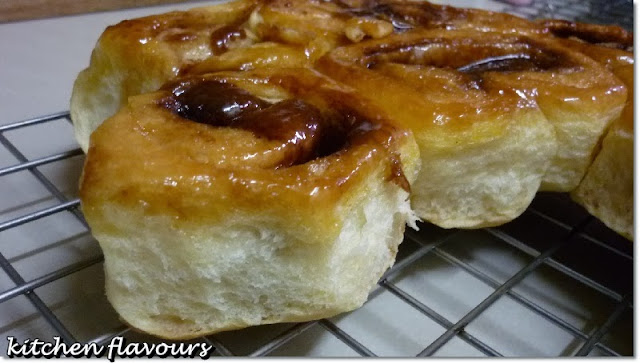
Brush the rolls with egg wash and bake for about 25 minutes until golden brown. Picture above is the bread just after baking, notice that one roll is missing on the left? Yum!  Not me, it's the hubby! :)


Turn them upside down and the gooey, sticky caramel is all there!


These rolls are just so delicious. The texture of the bread is really so soft and fluffy! The caramel is sticky, gooey and sweet, an absolute delight! Both hubby and me had two rolls each while these are still warm and fresh from the oven, and we actually just had our dinner! Just could not resist the second piece! I made this in the evening, meant for our breakfast the next morning.


All the 16 rolls are gone by the next day. I will definitely make this again, so good!
I'm glad that I've reduced the sugar, as they turn out really good, without being too sweet, yet sweet enough that you would go for seconds!

Kitchen Flavours notes :
~ reduce the sugar for the dough to 1/4 cup
~ reduce the sugar for the caramel to 1/3 cup, and corn syrup to 3 tablespoons
~ added 1 tablespoon of sifted cocoa powder to the sugar-cinnamon mixture
~ used bread flour, in total 3-1/8 cups


For the full recipe, please visit Jasline of Foodie Baker and to view other members' bake, drop by The Home Bakers (THB).


Welcome to The Home Bakers


We are a group of home bakers who are currently baking from "Coffee Cakes" by Lou Seibert Pappas, until each recipe from this book has been baked. This is our bake no. 27 and we have 33 recipes more to go. If you are interested to be a member and join in our bakes, you may drop me an email at kitchenflavours@yahoo.com.

Wednesday, November 13, 2013

Kai Phat Nam Phrik Phao (Chicken with Chilli Jam)

I have some Thai Basil plants growing in my potted garden and I was hoping that these plants would provide me with fresh basil leaves in time for Lena's Asian Food Fest event, featuring Thailand, and the timing is just right! The plants have grown and the leaves are ready to be used in my cooking pot.


Some of my Thai Basil plants.


More basil plants.


Harvested some of the basil leaves and fresh chillies for this dish below. 


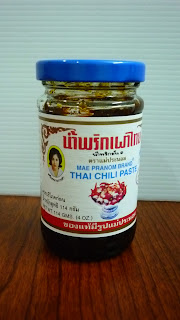
Thai Chili Paste, known as Chilli Jam from the cookbook.


This is a simple stir-fry chicken dish which is great for "everyday dish". In the cookbook, there's a recipe for Chilli Jam paste, and from the photo I thought that it looked the same as the one I bought many months ago. Ransacked my pantry and out came this bottle of Thai Chilli Paste, magic! Haha! I bought this chilli paste many months ago and have forgotten all about it. I checked the ingredients contents, and they are exactly the same, so instead of making my own, I better use up this store-bought paste.


A perfect dish for a busy weeknight dinner. Very simple and easy to prepare, it takes just minutes. I've cooked just half a recipe and it was just right for me and hubby. We had it with rice for dinner. You may adjust the spiciness by adding more of the Chilli Jam for a spicier taste, or use less if you prefer a milder dish. 


Kai Phat Nam Phrik Phao (Chicken with Chilli Jam)
(adapted from "The Food of Thailand")
Serves 4
2 teaspoons fish sauce
2 tablespoons oyster sauce
60ml (1/4 cup) coconut milk
1/2 teaspoon sugar
2-1/2 tablespoons vegetable oil
6 garlic cloves, finely chopped
1-1/2 tablespoons chilli jam, to taste
500gm skinless chicken breast fillets, finely sliced
a handful of holy basil leaves
1 long red or green chilli, seeded and finely sliced, for garnish

  1. Mix the fish sauce, oyster sauce, coconut milk and sugar in a small bowl.
  2. Heat the oil in a wok or frying pan and stir-fry half the garlic over a medium heat until light brown. Add half the chilli jam and stir-fry for another 2 minutes or until fragrant. Add half of the chicken and stir-fry over a high heat for 2 to 3 minutes. Remove from the wok. Repeat with the remaining garlic, chilli jam and chicken. Return all the chicken to the wok.
  3. Add the fish sauce mixture to the wok and stir-fry for a few more seconds or until the chicken is cooked. Taste, then adjust the seasoning if necessary. Stir in the basil leaves. Garnish with chilli slices.


Lena from frozen wings is hosting Asian Food Fest (Thailand) for this month, cook any food from Thailand and link your post. Drop by Lena's for more info about joining in this delicious event.


" I am submitting this post to Asian Food Fest ( Thailand ) - November Month hosted by Lena of frozen wings


I'm sharing this post with :

 photo 77951578-1914-4b72-8eda-9e40a91183ac_zps331eb4b4.jpg